Month: July 2023

  • VM deployed from OVF fails to create Snapshot for backup

    **Purely for demonstration purposes – Snapshots are not supported with NSX-T Manager – However, this may be applicable elsewhere.

    ** After some further research while preparing this article, I found an KB from VMware advising that snapshots was disabled on purpose for NSX Manager, they advise that Snapshots are not supported – This means you will either need to configure backups through the appliance using SFTP or use Network Block Device backups without snapshots. 

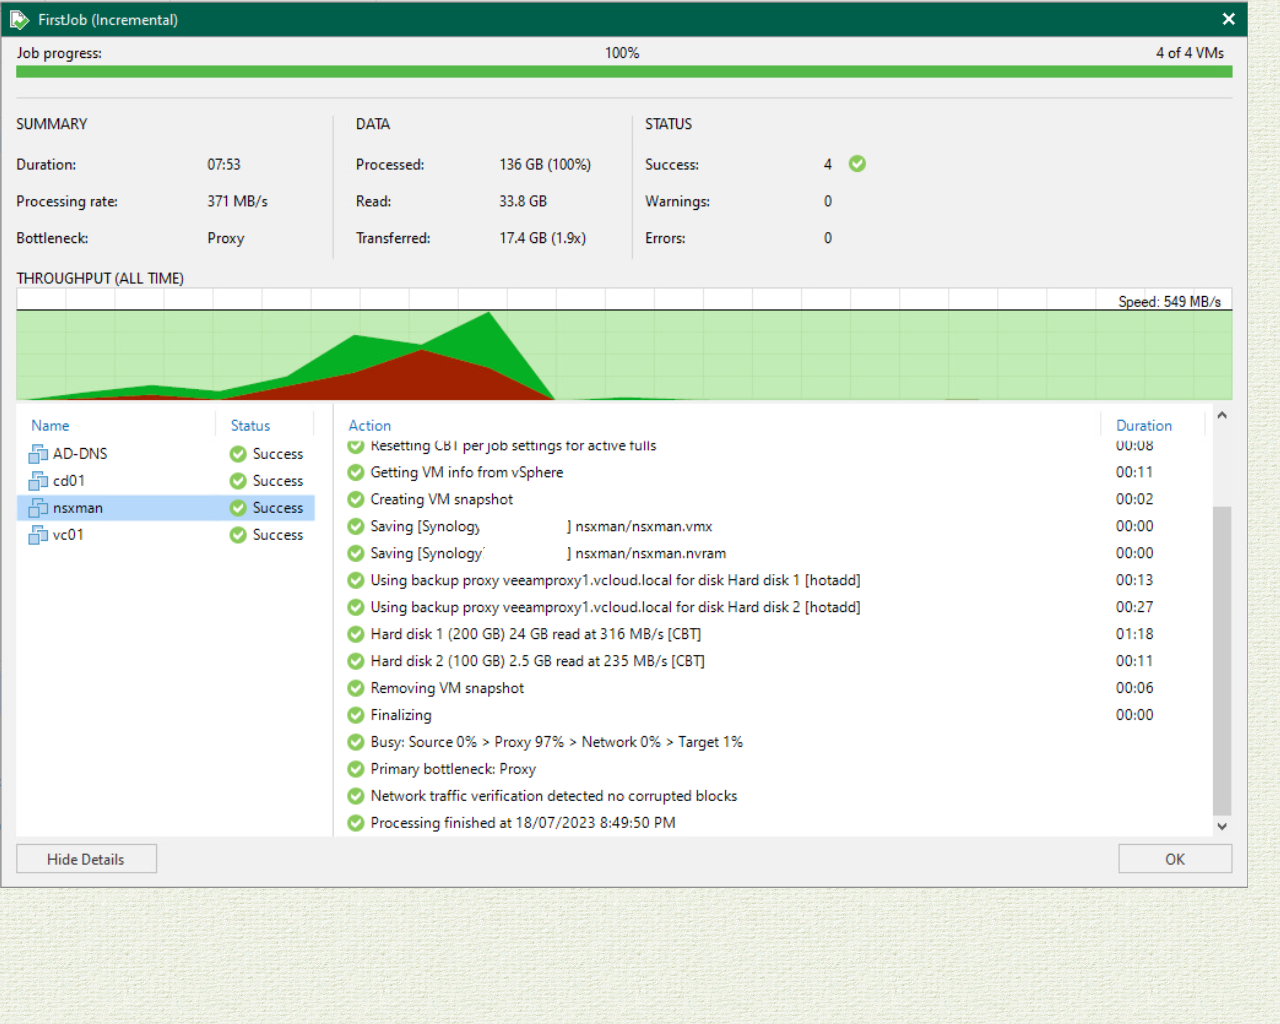
    While I was setting up and running my first job for backing up my lab, I ran into an issue where my NSX Manager appliance was unable to take a snapshot.  I was using Veeam to run my backups, I had several different guest OS types in the job, with 3 being Photon based appliances.

    All 3 of these appliances had been deployed via OVF without issue. There had been no additional changes made.

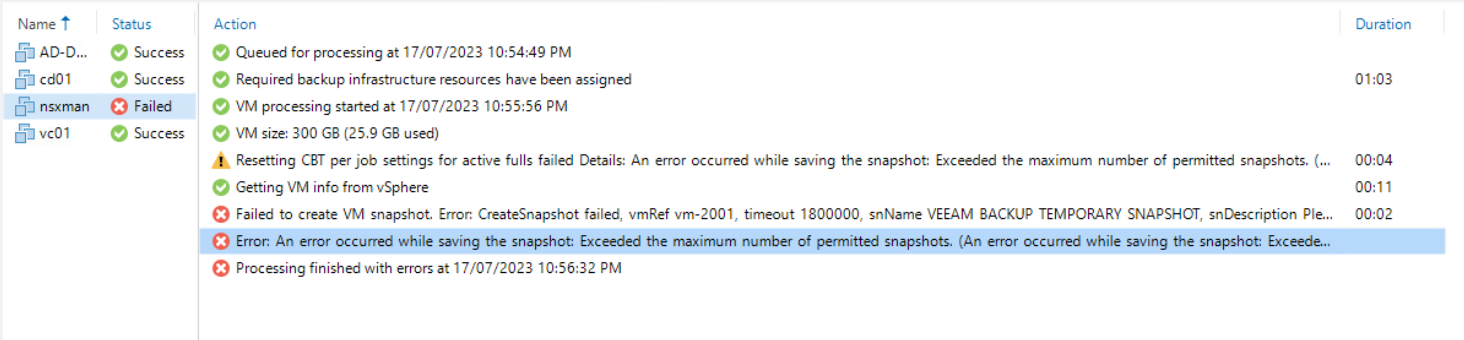
    On first run, the backup job failed on the NSX Manager, this seemed a little unusual as the error message was stating that the VM had reached its Maximum number of snapshots. Given that there was only 2 disks attached, this was quite bizarre, so I attempted to create a snapshot directly though vCenter and received the same error.

    As this appeared to be a single VM issue, I went hunting through the VM settings to first see if the disks were configured as Independent Disks  – However, this was not the case and they were configured just like the others as Dependent.

    The next place to look was the Advanced Parameters of the VM, a goldmine of fine-grained settings for a vm.

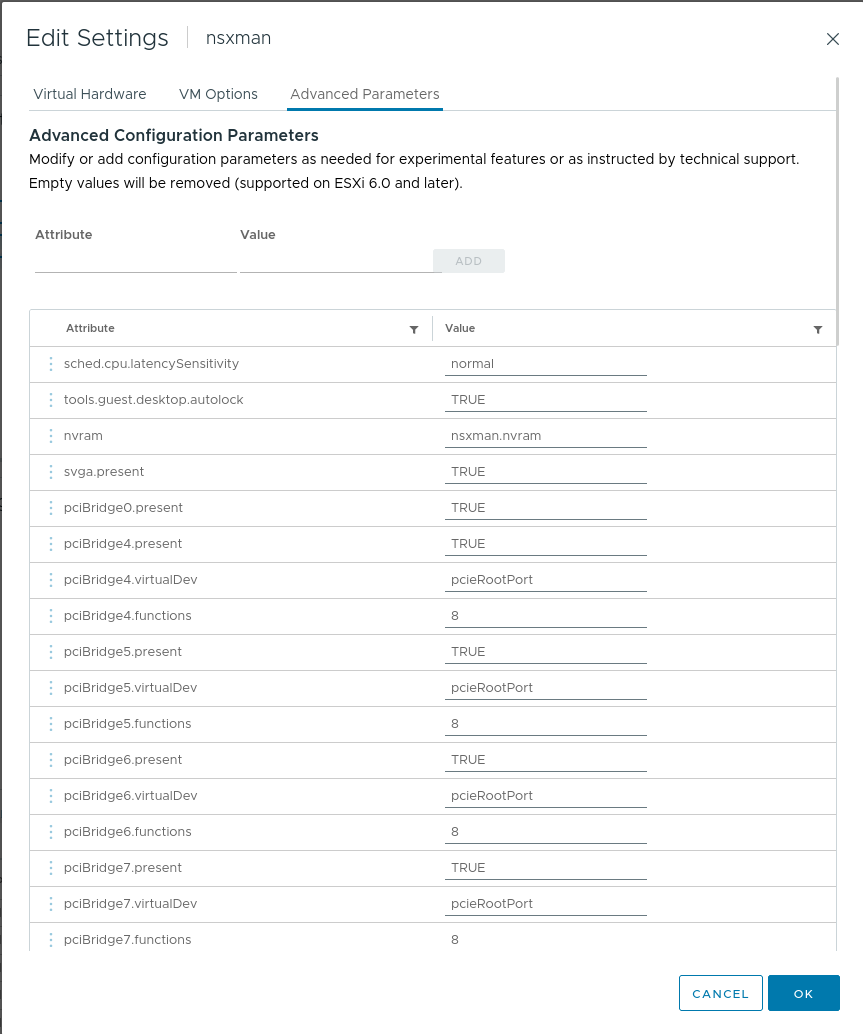
    Sure enough, I found the culprit, a one liner snapshot.maxSnapshots configured to ‘0’ – This meant that no snapshots could be created.


    To edit the number of snapshots that can be taken, you will need to power down the VM first. Once powered down, navigate back to the Advanced Parameters and from there update the number.

    Once saved, power back on the VM and perform your backup. Confirm that everything is once again successful.


  • Failed to configure Linux Server – Veeam Backup and Recovery

    Veeam has been embracing Linux servers to host the Veeam backup infrastructure with certain componets being expanded to support running on Linux alongside the Windows infrastructure.  Whilst the Windows side is fairly well understood for those who have been using Veeam for a long time, the Linux infrastructure piece is starting to take hold with many starting to make the move, however there are still some admins who shy away thinking that deploying Linux is ‘too hard.’ – this couldn’t be further from the truth.

    While configuring my first Linux server for hosting my Veeam repository, I ran into only 1 issue that was easily solved with ticking a couple of extra boxes.

    For this particular server, I was utlising Ubuntu 22.04.02 – the installation was very seamless as the installer walks you through one step at a time.

    The issue that I ran into was during the ‘Apply’ stage of adding the Linux server to Veeam in order to be able to use it for a Proxy or Repository. I received the error Installing Installer service Error: mkdir: cannot create directory ‘/opt/veeam’: Permission Denied.   Those last 2 words there are the hint.


    In order to resolve, you will need to update and ensure that the user account has either the right escalated permissions configured on the Linux server or you need to enable and set the credential in the Managed Credentials for the user to have escalated rights.

    There are 2 options that you will need to enable under the Managed Credentials, and you can just click backwards in the wizard to update them.

    Once you have entered the Managed Credentials, you just need to edit the user in which you want to create the Veeam BR and Linux server connection with. here you will find the section ‘Non-root Account’ – this is where you will need to select “Elevate account privileges automatically.”  By selecting this, you are allowing Veeam to do the heavy lifting by configuring the account as needed.

    The next 2 tick boxes allow you to have the account placed in the sudoers file so that it has the full access that it needs to the server. The ‘Use “su” if “sudo” fails’  is a fallback option allowing Veeam to be compatible with more Linux distros as some require the use of su rather than sudo  to elevate access.

    You will then be required to supply the root password so that Veeam can make the required change for the account access.

    Once the changes have been made, you can then proceed to applying the configuration – you should see the remaining tasks be completed successfully.

    From this point, you can add this server to be your repository or proxy, depending on what it is intended for.