Category: Uncategorized

  • Let’s Zoom to SFD20

    Let’s Zoom to SFD20

    It’s that time again that I prepare myself for another action packed week with the team at another Storage Field Day. This time we will be passing up the flights and instead of meeting in hotel and vendor conference rooms, we will be meeting virtually with our presenting vendors.

    We have a number of vendors who will be coming along to present throughout the 3 days. As we are now joining virtually, this does present some new challenges as a number of us are joining from our home countries which are across a number of different timezones. I will be joining the calls from 1am local time, until 7am.

    Below you will find the timetable for the week, along with the presenting companies. You can also find this table on their SFD20 page at techfieldday.com. as well as the stream during the event.  All videos will posted online after the event.

    Wednesday, Aug 5 8:00-10:00 Pensando Presents at Storage Field Day 20
    Wednesday, Aug 5 11:00-12:00 Cisco Presents NVMe Transport at Storage Field Day 20
    Thursday, Aug 6 8:00-9:00 Qumulo Presents at Storage Field Day 20
    Thursday, Aug 6 10:00-12:00 Nebulon Presents at Storage Field Day 20
    Presenters: Andy Roberts, Clint Wyckoff, Josh Price, Michael Heyeck, Siamak Nazari
    Thursday, Aug 6 13:00-14:00 Intel Presents at Storage Field Day 20
    Friday, Aug 7 8:00-9:30 VAST Data Presents at Storage Field Day 20
    Presenters: Howard Marks, Jeff Denworth, Renen Hallak
    Friday, Aug 7 11:00-13:00 Pure Storage Presents at Storage Field Day 20
    All dates and times listed are local time in Silicon Valley, US/Pacific..

    As always, I am looking forward to this event as I will be able to hear about some new technology, what some vendors are up to these days, and last but not least, make new friends along the way.   If you can join us on the stream, or via twitter using the hashtag #SFD20 – make sure you say “Hi”

  • My Microsoft Build Release Previews

    My Microsoft Build Release Previews

    This post may come as a bit of a surprise to some of you who have seen my focus mostly on Storage, Backup and VMware products, but the world is a bigger place and there are technologies out there that are evolving and my interests have done a complete 360 back to my earlier days.

    This past week, we have seen the Microsoft Build conference take place streaming hundreds of sessions live from the presenter’s own home. For me, this has been a great opportunity for technologist to be able to be part of a conference they may not have been able to attend previously. I know for myself, I would not have spent the money previously to attend in-person, but that has more than likely changed now that I have had a a front row seat into the benefit of these sessions and what they have opened my eyes up to.  For the past couple of months, I’ve been thinking about moving back into the Microsoft space, I’ve spent the last 6 years focused on virtual infrastructure and less on guest OS. I’ve been dabbling in Linux for a little, but I am heavily focused on using MacOS as I’ve found Windows to be a bit too restrictive, that was until Microsoft started releasing some new exciting applications that have made a world of a difference to me and I feel have created a much more inclusive ecosystem. I use Windows 10 in the office, but any other time I will use my MacBook Pro. Since Microsoft brought out WSL, I have been using Ubuntu for all my SSH sessions and doing general command line web operations. Prior to this, I would pull out my MacBook or fire up a Linux VM.

    At Microsoft Build, there have been a number of new applications that have been released for preview that I am excited to see. The ones I am going to mention in this post are what I have found will help me in my day-to-day or just handy to have. There are many more out there, but here is my shortlist.


    1. Windows Terminal
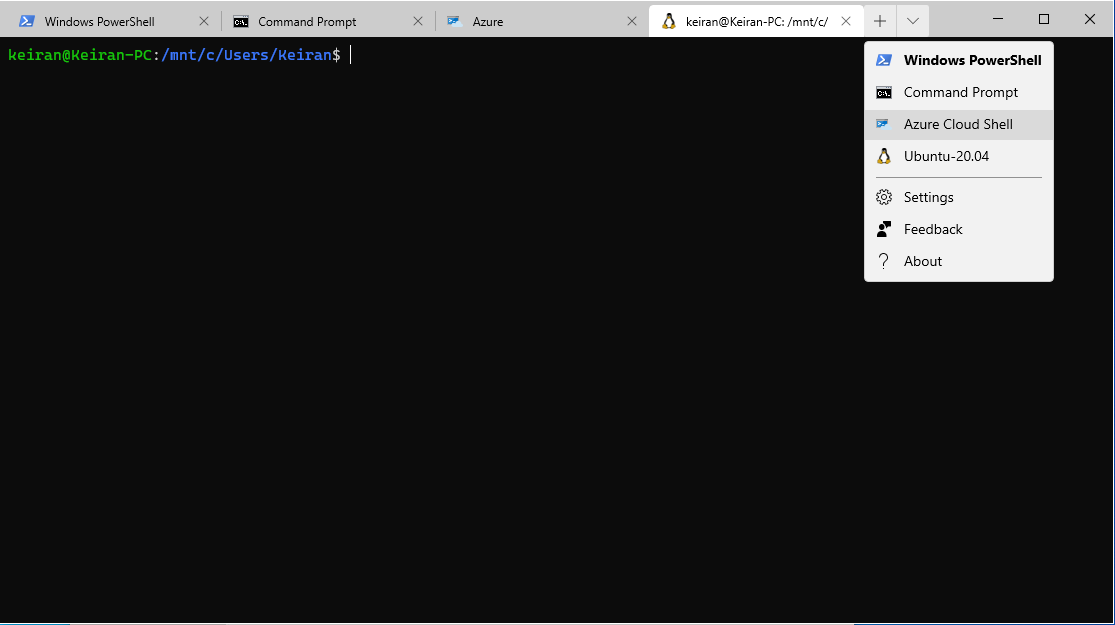
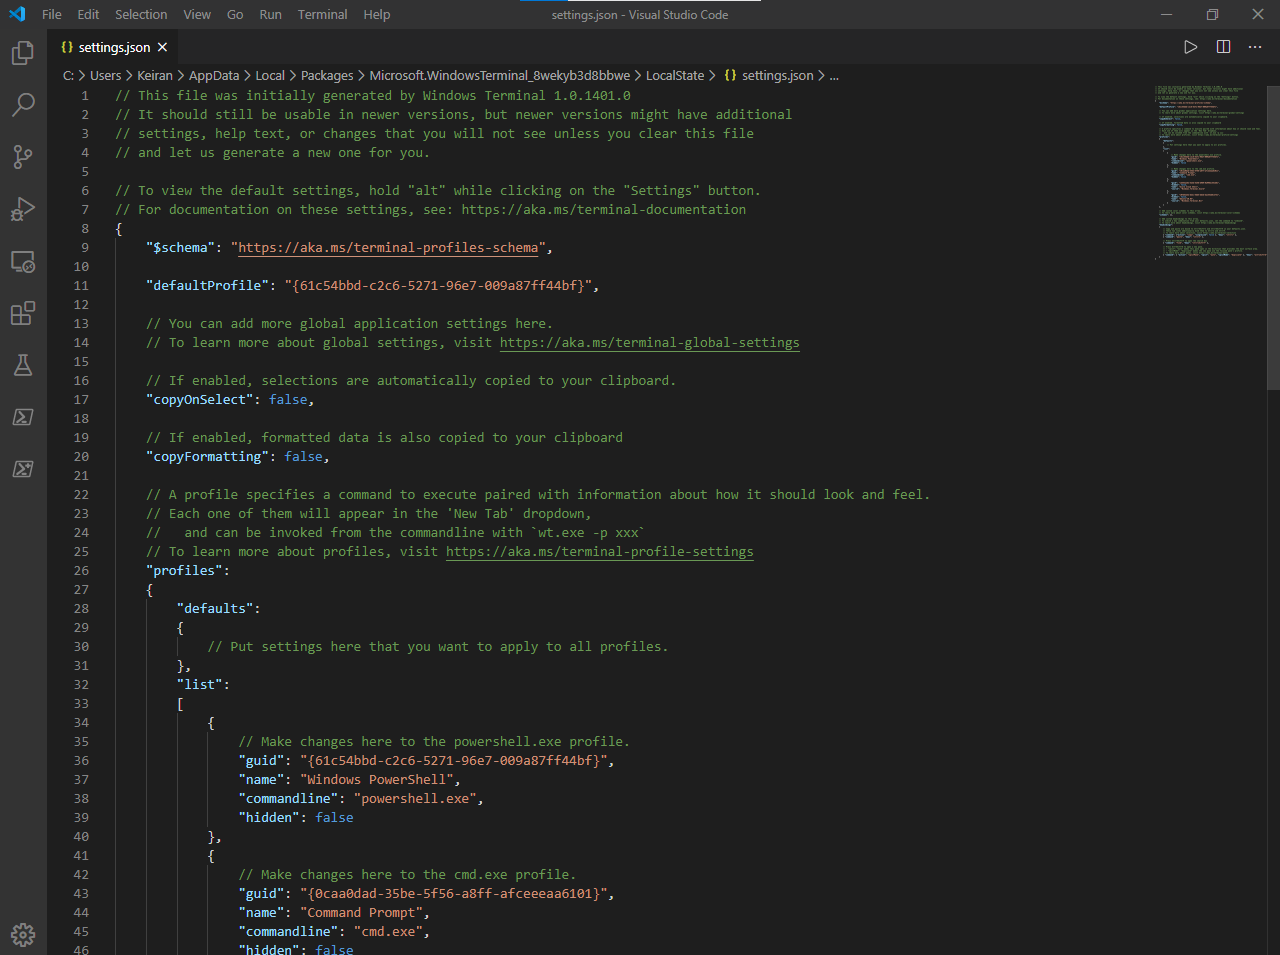
      Here we find what looks like a standard Powershell window, but alas, it has much greater functionality that just running a couple of one-liners or scripts, by default, there are several preconfigured command line tools available, but you can also edit the settings via it’s config file and add more applications to keep them all in one spot. Windows Terminal may only be command lines, but it’s the way you set it up and use it, that’s what makes it so powerful. Windows Terminal is now 1.0

      WIndows Terminal 1.0

      Windows Terminal Config
    2. PowerToysThis has been a very welcomed addition, although still in preview, PowerToys adds extra tools to be able to customise and manipulate files, and customise your workspace with FancyZones.
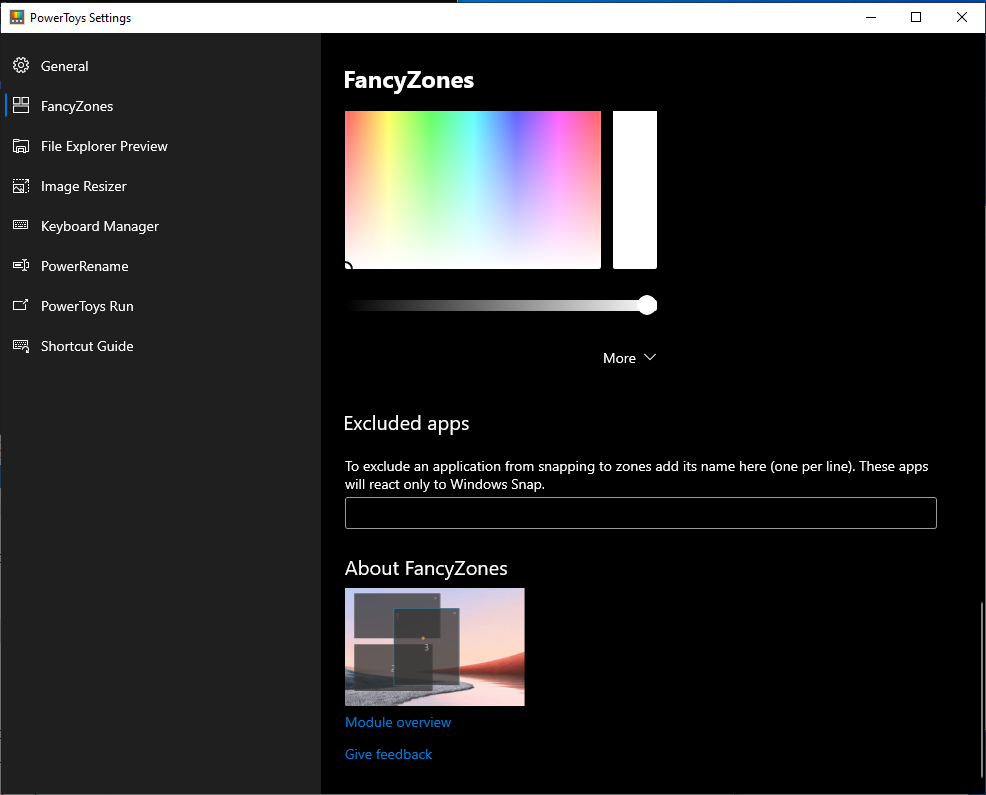
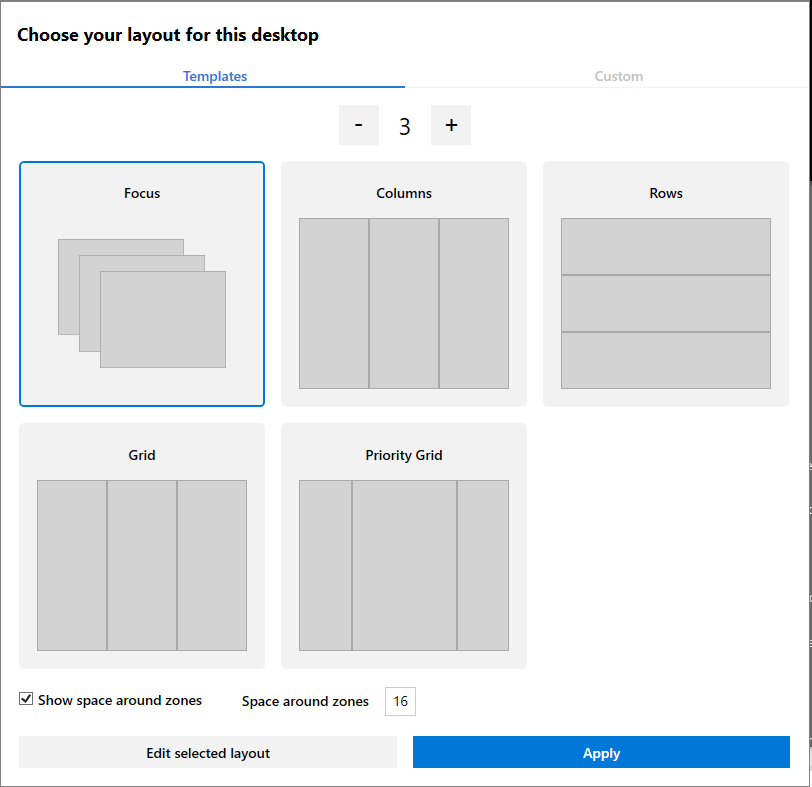
      FancyZones allows you for create layouts for applications and have them snap to certain areas of your desktop to create a useable workflow for our day to day activities. You can use the templates already provided or create your own layout. There are multiple colour options to show which zone is currently active and which others are inactive.

      PowerToys FancyZones Options
      PowerToys FancyZones Templates

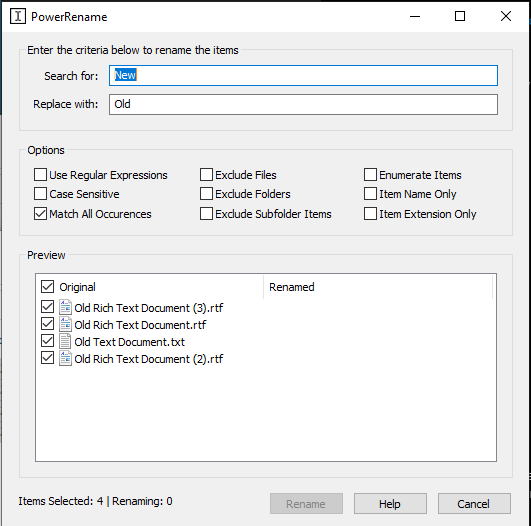
      The next 2 PowerToys will eliminate the need for 3rd party applications to be able to do bulk file renames and also image resizing. Don’t you hate I when you take a new set of photos for an event and they are all need something like “img_xxx”? – Well now you no longer need to either sit there renaming one by one or running through a 3rd party tool. PowerToys brings with it a simple File Renaming feature “PowerRename” that can be pinned to your explorer menu, allowing you to easily select your files, right click and Rename Files. The tool uses a “Find and Replace” method, so you can save time and only rename certain words, if needed.

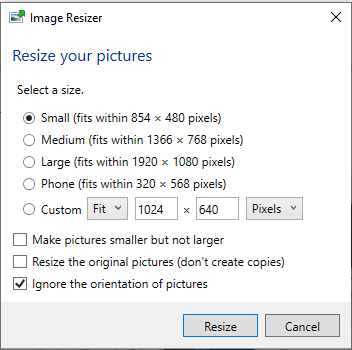
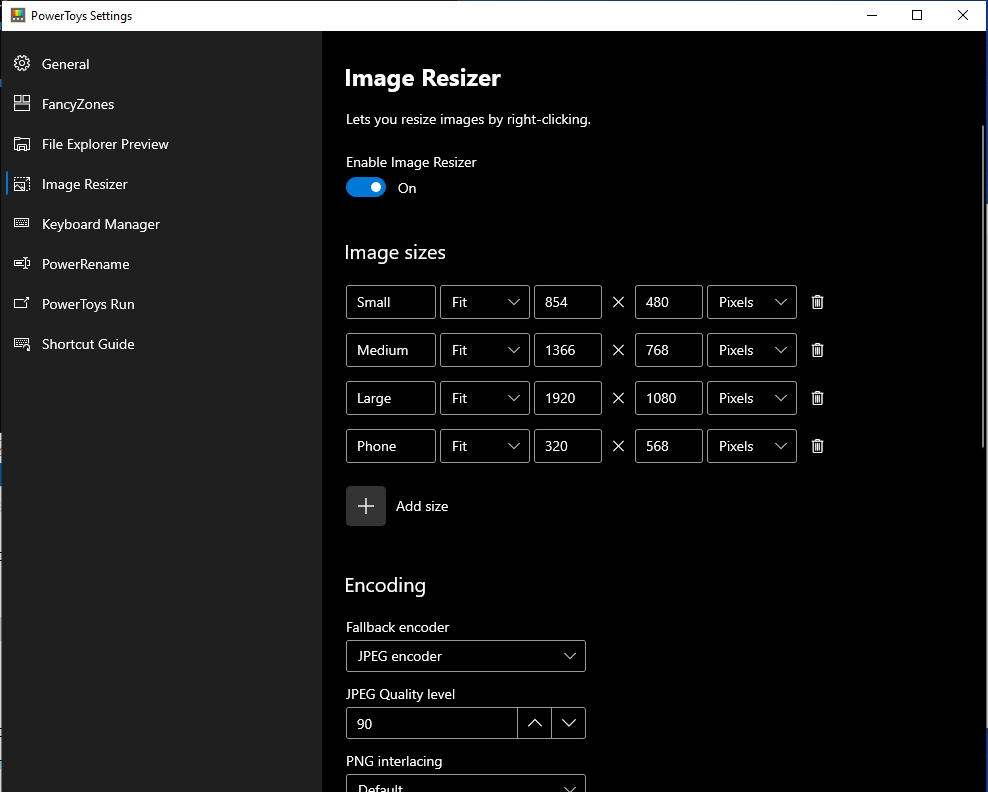
      The Image Resizer works in a similar to the File Renamer. In the settings, you can create your presets for your image sizes and then you just select your images, right click and choose the Image Resizer. You are then presented with a window to select the size you would like all your select images to be.

      PowerToys PowerRename
      Image Resizer

      Image Resizer Settings
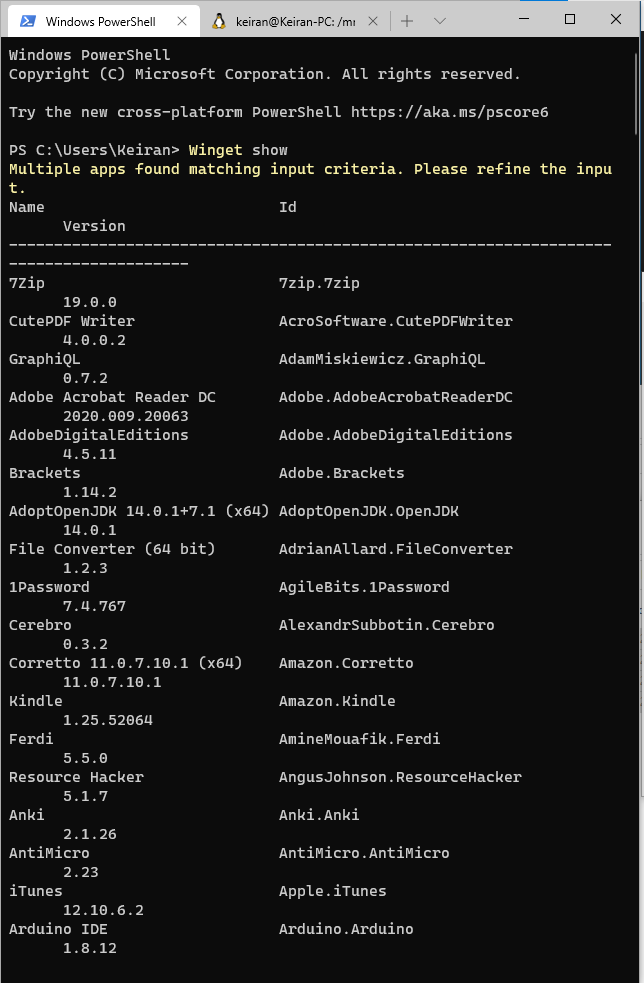
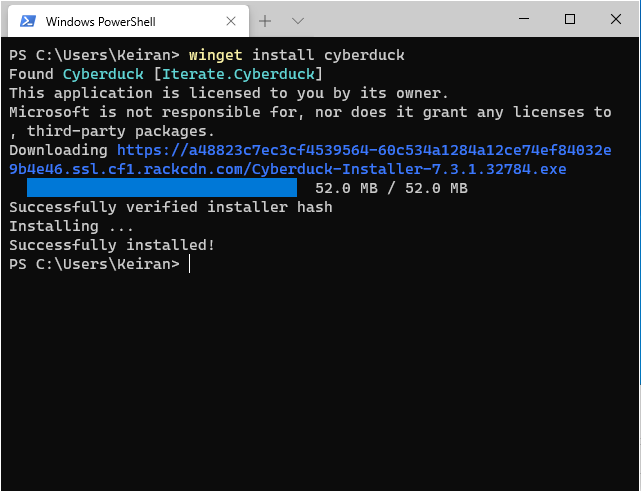
    3. Windows Package ManagerIf you have ever used Linux, whether it be Red Hat or Debian variants, you should be well aware of the yum (dnf) or apt package managers (some others exist for other distributions). Microsoft are now adding yet another feature to Windows to be able to move more inline with the evolving community and have release their new Windows Package Manager. Currently also in preview, it allows you to install recent releases of Windows applications through the commend line using winget.  Simple commands such as winget install and winget show will allow you to find and install available applications.  The winget show command will list the applications and their most recent version available. Once the application has been installed via the package manager, you will then be able to use it as any other application installed from an executable or msi file.
      winget install

      winget show


    Microsoft has certainly shown that they are listening to what users want, and are learning what people need to be able to operate in their day jobs. Previously, we needed tools such as putty to connect to SSH sessions, but with Terminals and WSL2, we are now able to connect with all in one tools from one operating system. I am excited to see what else is out there coming from Microsoft and where they roadmap is heading. If you missed any Microsoft Build sessions, you can head over and watch them on-demand.

  • Introducing vSphere Lifecycle Manager -vSphere 7

    Introducing vSphere Lifecycle Manager -vSphere 7

    On Thursday we saw VMware release their next major release in the vSphere product line. vSphere 7 was finally GA’d after a number of months since Project Tanzu and Project Pacific were announced at VMworld US 2019. There have been some significant changes in this release where some items have been removed and a large number of new features added.

    In this particular article, I want to cover the changes made to vSphere Update Manager (VUM) or as it is now known as vSphere Lifecycle Manager (vLCM). vLCM incorporates vboth the original vSphere Update Manager controls as well as managing firmware updates for your hosts hardware.

    vLCM is designed to not only apply the standard upgrades, patches, VMware Tools and Virtual Machine hardware updates as the previous vSphere Update Manager, but it is also has the ability to apply firmware updates to your hosts hardware. These new features to apply OEM software updates to your host hardware are only available to hosts running ESXi 7.0. Actions such as host patching, updates and upgrades are still available for lower versions 6.5 and 6.7. When using an ISO through vLCM to upgrade your hosts, you will still only be able to use the matching major version of vCenter, will not be able to use a lower version to say upgrade a 6.5 host to 6.7 while using vCenter 7.

    vSphere Lifecycle Manager is only available under the HTML5 vSphere client, and rightly so as the flash client has been completely removed. There are 5 top menu items and each with related sub-menu’s underneath. These are arranged as below:

    • Image Depot
      o ESXi Versions
      o Vendor Addons
      o Components
    •  Updates
    • Imported iSOs
    • Baselines
    • Settings

    Image Depot
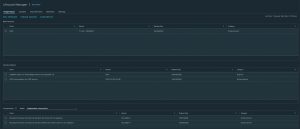
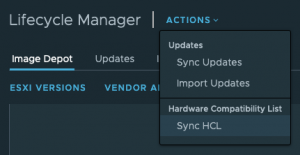
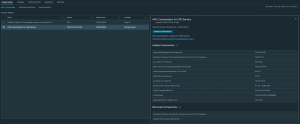
    The image depot displays 3 sets of tables, each presenting a list of items that together will help form your remediate image to manage your host updates. You will start with your Base VMware ESXi Image, then you can either select to use updated firmware bundles provided by the vendor or select individual components to update. The vLCM will sync with the the VMware HCL to provide an up-to-date approved list of firmware.

    ESXi Versions
    This is a collective list of VMware base images that are available in the depot. Selecting the image will provide information on the included software and drives that are available and may be installed when the host if remediated.

    Vendor Addons
    In this list, you will find a collection of component updates in a single bundle provided by the vendor. Here you will get a select list which the vendor has approved to work together and information provided on each update. There is also an included list of the drivers that have also been removed from the build.

    Components
    This menu provides a list of available individual component firmware updates that you can include in your remediation images. If you have found that you do not want certain components updated in the vendor addons or that there is a critical fix that is only required for one component, then you will be able to add these components separately to your image.

    Outside of the new Image Deport, there are the standard vSphere Update Manager options avialble to remediate your hosts with the standard Patches, VMware Tools, VM Hardware Version through the use of baselines and baseline groups.

    The introduction of the new Image Depot included in vSphere Lifecycle Manager definitely seems to look promising and is a nice addition. This will certainly help save a lot of time researching and bridging the gap between ESXi and supported vendor drivers and firmware versions. This is certainly a great new step forward.

  • Western Digital Presents at SFD19

    Western Digital Presents at SFD19

    Back in 2003, I built a computer with my Dad, we had put an 80GB hard disk into it, and I certainly remember thinking I would never utilise the full capacity of the drive. About a year later, I started to attend LAN parties and in no time, I had a couple of more drive installed in the computer. What I didn’t realise at the time was that data would grow, and it wasn’t just the computer games I played with their updates, there were movies that were getting bigger with better quality as time went on.

    In today’s world, data is growing at an exploding rate as we build more and more devices that need to be connected and that generate data. By 2023 there will be an estimated 103 Zettabytes of data created. This is a huge number, one that has been created from documents, photos\videos, social media, bank transactions, IoT devices, essentially anything that is computerised. The world of technology is growing and data is becoming quicker to be transferred between devices, which allows it to be created at higher quality, the limitations are being raised to a new level. The first images of a black hole were taken over a 5 days period from 8 radio telescopes, this generated 4.5 Petabytes of data, this was just to create one image.

    Western Digital is working hard to help keep up with the rapid rate of data growth. They are a leading company that carries an amazing portfolio of decades of storage development. They hold over 14 thousand active patents on their technology and have a large global team that listen to their customers and continuously evolve.

    At Storage Field Day 19, we heard from a number of presenters from Western Digital talk about how them and their products are evolving with the demand for faster and more reliable data storage as well as better security.

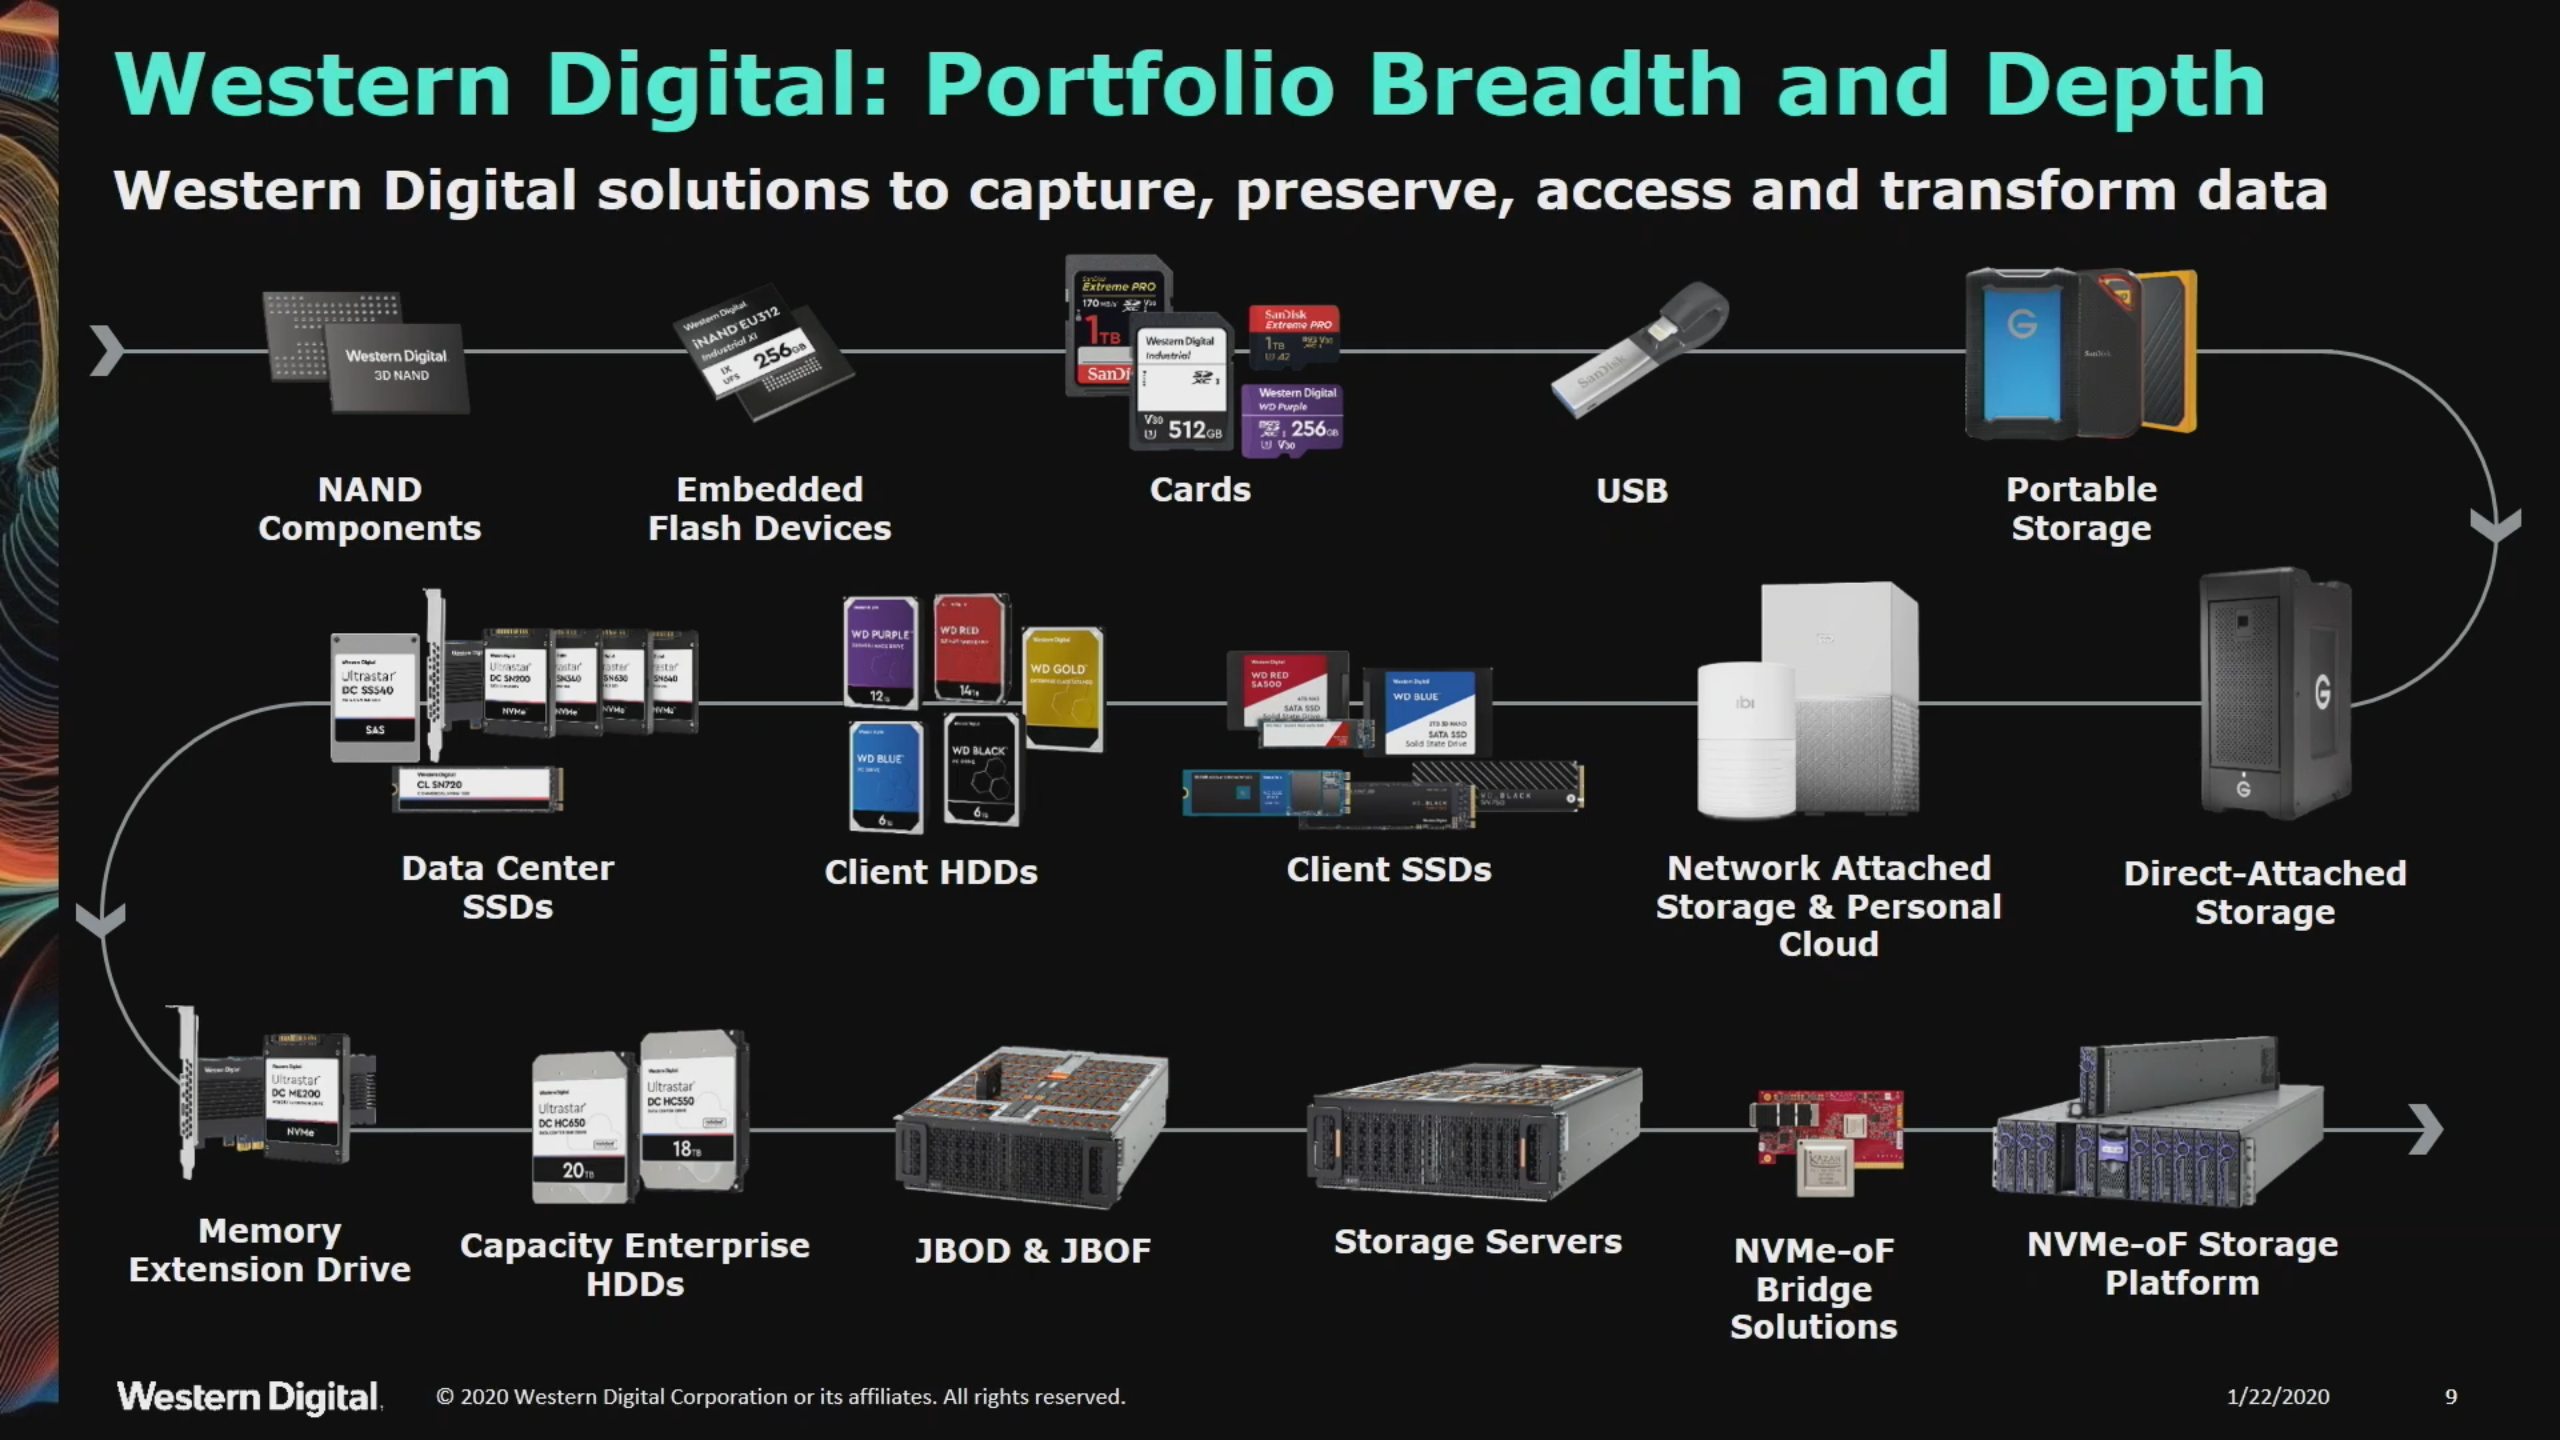
    After 50 years building out storage products from spinning disks to micro SD cards through to enterprise NVMe-OF Storage platforms, Western Digital has the history and the expertise to develop far greater technology while keeping up with the demands of the ever growing global data rate.

    Thank you to Western Digital for presenting at SFD19.


  • First Steps to Tackling my Anxiety.

    On Tuesday, prior to the kick off for Storage Field Day, I was invited along with Arjan Timmerman and Chin-Fah Heoh to Pure Storage to record an episode of The On Premise IT Roundtable podcast with Pure Storage’s Brian Gold. It was a privilege to have been asked along to be part of the conversation.

    When this year started, I wrote my 3 goals, and one of them carried on from last year. it was to help beat my anxiety with public speaking. Since Joining the TechFieldDay crew, I have used this as an opportunity to step out of my comfort zone. IN 2018, I attended my first Field Day at SFD16 and walking into the room when I arrive in Boston, I did not know anyone. In this instance I told myself that I had just flew 20 hrs to attend this and I need to suck it up and go shake someone’s hand and start a conversation. That was the very first step. Along the next few days I kept meeting new people, however when I asked a question during the presentations, my heart started racing and I started to sweat.

    Come TFD18 in Feb, 2019. it was a similar situation where I felt I needed to take the next step in tackling my anxiety, and there was an opportunity to do an ignite presentation, unfortunately, I really felt I wasn’t prepared and didn’t raise my hand to do one. That chance to present was a missed opportunity, I look back and think about the step backwards I took and how I did not help my situation.

    In June 2019, I was asked to be on Nerd Journey Podcast to discuss a topic I wrote about a couple of years prior, All of a sudden, I felt like I couldn’t do it, but I wrote an email back say “Yes, I’d be glad to.” because I knew that if I sat on it, then I would never do it. During the lead up I took time to prepare for the podcast, I wrote several pages of notes about the topic and about myself. The lead up on the day of the recording, I was feeling ok, I had thoughts running through my head, but I was relatively calm, when I first spoke with John and Nick prior to recording, I felt good, until the record button was pressed. This was the point where my heart rate increased and my head went blank, even though I had my notes in front of me, I not once looked at them,. I completely forgot they were there as I was trying to focus on the question. I did not feel as though it went well. I listened back to the recording to suggest some edits where I thought I might have said too much about a particular topic, or thought it wasn’t a clear answer. it was hard to listen to myself speak, it isn’t something I like to hear and I felt that I was not good at it.

    I have since reflected on that experience and I still recognise what went wrong for me. However, I know I have since been able to accept that I won’t ever get it right the first time, it always requires practice and lots of it. So when I was asked to do the On Premise IT Roundtable podcast, I immediately said, “Yes.” and then regretted it after as I start to fret saying “I don’t know how I’m going to have anything to say about that topic.” “I’m going to freeze and not have a single thing to say.”  – but it was actually not like that in the end.

    It was yet another interesting experience for me. While we were given a very high level premise, there was no specific topic, as that was yet to be chosen. I started to over-think that I probably wouldn’t have anything much to contribute, or not to the depth that would be required. When we came to recording the podcast, the topic that was chosen was something I had an extremely high-level view of and next to no technical knowledge of, mostly due to never requiring the use. At this point, I started to freak out with just thoughts running through my head, even to the point that by just introducing myself, my heart was pounding so much that I was trying to see if my mic was picking it up. As the conversation moved along, I started to feel more calm, it wasn’t as bad as I thought it would be. I still didn’t say a lot, and certainly not much from a technical perspective.

    In the end, I was very glad I did take the opportunity to join the podcast and record as I am now able to reflect and apply the practice into the week ahead for SFD19. In fact, I have now also been invited to talk on another podcast during the week with 2 other SFD delegates and of course I said, “Yes.” I may still feel like I’ve made a terrible decision and that I don’t want to do it, but deep down I want to be able to sit down and be able to control my anxiety so that I can be confident in presentations and podcasts. This is why I love Tech Field Day, I am learning more about myself and pushing my comfort zone over the edge.  It takes practice and letting go of those fears, but as I’ve learnt, saying, “Yes.” is the first step in achieving your goals.

    Check out the Storage Field Day 19 schedule and join us for a week of in-depth discussions around storage.
  • California, Show your teeth… Storage Field Day 19

    California, Show your teeth… Storage Field Day 19


    That’s right, another year and another Tech Field Day event is just around the corner. This time, I will be returning for my 2nd Storage Field Day (SFD19) event in late January, 2020. This will be my 3rd Field Day that I will be attending, and it will be my first in sunny California, right in the heart of Silicon Valley/San Jose.

    So, what is in store for the SFD19 team and you? We will be checking out some new technology and some cool automation from various vendors. There are 9 presenting companies that will be at SFD19, including a secret company that the delegates aren’t even aware of yet!

    There will be a panel of 12 delegates again, each from various storage backgrounds with a focus to open up discussions and dig deeper into the technology.

    Arjan Timmerman
    Becky Elliott
    Chin-Fat Heoh
    Chris M Evans
    Dan Frith
    Enrico Signoretti
    Gina Rosenthal
    Joey D’Antoni
    Keiran Shelden
    Ray Lucchesi
    Ruairi McBride
    Vuong Pham

    This is going to be one full on event, looking at the time table, there is just presentation after presentation, so there will be plenty of information flowing.

    If you would like to stream live, check out the SFD19 page or Tech Field Day home page, or Facebook to watch the presentations. These will be available on YouTube and Vimeo after the event, so you can always catch up afterwards.

    Finally, if you are interested in attending any of the upcoming events, please reach out to the Tech Field Day crew and let them know you are interested in attending an upcoming event.

    A big thanks goes out to the Tech Field Day crew for inviting me to another event, and I look forward to sharing my views with you all after SFD19 concludes.


  • Veeam Backup & Replication 9.5 Install – Back to Basics.

    Veeam Backup & Replication 9.5 Install – Back to Basics.


    Sometimes it is good to go back to basics, somethings change between different versions of software and the installation process isn’t always the same. Sometimes, you may have never installed that piece of software before, but the only installation guide is 3 versions in the past and they have since introduced the need for IIS for a new web portal or something. So here we go in the first post of my new Veeam series “How to install Veeam Backup and Replication” 

    1. Download the latest Veeam VBR ISO from the support download page. 
    2. Depending on version downloaded, you may need to extract the ISOs from the ZIP
    3. Mount the “VeeamBackup&Replication” ISO and open the setup.exe
    4. Click the install icon for Veeam Backup & Replication.
    • Read and Accept the EULA (You can’t proceed if you don’t agree) 
    • If you have a license file, attach it. Otherwise, you will get 30 days free trial
    • Choose your components to install. 
      • Veeam Backup & Replication– This is the main application for configuring and running backup & replication tasks.
      • Veeam Backup Catalog– Used to index the files into a GuestOS backup file for easy restoration. 
      • Veeam Backup & Replication Console– The console is the GUI used to perform tasks and configure Veeam Backup & Replication. 
    • The System Configuration check is used to ensure the correct components are available and installed ready for Veeam B&R to install and configure.
      If there are components showing as Failed, click on the “Install” button to get them installed.  
    • One installed, re-run the check and ensure each component passes. Click “next”. 
    1. Review the default configuration, this includes directory locations, ports and SQL instances. You can select “Let me specify different settings” if you need to make any changes. Click Install to continue. 
    • Wait until installation completes. The installation will take approx. 10 minutes, and if there is an update as part of the install, you will see this occur towards the end of the process. 
    • You will be notified once completed. 
    • Double click on the Veeam icon on the desktop to open the console and put in your Username and password and click connect.
    • By default, the Component update will open up and require you to run the update on any components that require it. They will be listed. Select and apply the updates.
    • Under “Inventory” > “Virtual Infrastructure” > select “ADD SERVER” > Select type of server (in this case, VMware vSphere). NB:You will need to run this process before you can set up your proxies.
    • Input your vCenter (or host) details for Veeam to connect to. 
    • Add your server credentials into the credential manager. 
    • Trust the certificate if it is Self-signed. Please see KB2806 regarding 9.5U3 self-signed Cert bug. 
    • Confirm settings are all correct and click “finish”. 
    • Confirm under “Virtual Infrastructure” > VMware vSphere” that you can see your vCenter hierarchy. 
    • Under “Backup Infrastructure” > “select Backup Proxies”

    • Add in your proxy server’s IP/hostname and a description
    • Add your credentials for the proxy server, or reuse pre-configured.
    • Wait for components to all install. 
    • Confirm the Proxy service details
    • Once you click “finish”, you will return back to the VMware Proxy screen, here you will be able to set your Transport Mode and Datastores. 
    • Select “Choose” for Transport Mode. This will show you a number of options with descriptions to help you choose the correct transport mode to meet your infrastructure requirements. If unsure, select Automatic Selection.
    • Once you continue on, you will have the opportunity to set up traffic rules where you can create bandwidth restrictions. Here you can get granular and create policies for certain IPs. 
    • Once you have finished setting up your proxy, you will then need to set up your repository for storing your backups and/or replications. Select “Backup Repositories” and Set up a new repository. Start off by giving your repo a name. 
    • Veeam offers support for a number of different types of repositories. Select the best option for your infrastructure. (This tutorial will just be a Windows Server.) 
    • Under “Server” choose the repository server from the list or click  “Add New…” server. Once added click the “Populate” button to see the capacities and free space available. Once identified, select the disk you want to use. 
    • In your Repository settings, you can setup the path for which you want your backups to go to. Once set, click the “Populate” button again. Veeam also offers Load Control to assist with your bandwidth and disk performance for your backups, use and adjust as required. 
    • With Windows Server 2016, Microsoft introduced ReFS, their new volume format that allows for greater capabilities. Veeam acknowledges these abilities and advises you of the benefits of using ReFS over NTFS.  *Proceeding will not prevent you from using the Datastore. NB: ReFS is reasonably resources heavy.
    • Under Mount Server, you can set which server will take the load when mounting a restore point with Instant VM Recovery, SureBackup or On-Demand Sandbox. If you have the ability to provide write caching for the mount server, you can enable vPower NFS Service to assist with those mount points.
    • Once all configured, the review stage will confirm if any of the additional components will need to be installed on the new Backup Repository. Once confirmed, you can apply and let Veeam set up the repository. 
    • During the apply process, you will be able to confirm all steps completion. 
    • Once your infrastructure is configured, it is down to business and time to test and create your first Backup job. Under “Backups”, Right click and Select “New Backup Job.” Set a Name and then select your Virtual Machines you would like to backup.  
    • Click recalculate to ensure the total size is updated to reflect the size of the disks to backup. You can also exclude objects from being backed up. 
    • Select your proxy, if you have a Proxy server setup, then choose that one. Otherwise, if you did not setup a proxy earlier, you can use VMware as the Backup Proxy, however this will be a slower process. 

    • Select your Repository for the backup job. In this screen, you can also set the amount for restore points you want to keep and any advanced settings such as additional scripts, Email notifications, backup modes (Incremental, Active Full, etc.) etc. 
    • The Guest Processing page is used to configure the backup job to leverage Application Aware processing and also file indexing and exclusions, and much more.
    • The schedule is fairly self-explanatory. Here you can configure how often the job will run and how many retry attempts before failing the job. 
    • Once all settings have been configured, apply the configuration and if appropriate, Run the job once created. 

    • Watch the progress and if there are any errors, adjust your components where required. 
  • PowerCLI: Import-vApp OVA: Hostname cannot be parsed.

    The other day I was rebuilding my lab using William Lam’s vGhetto vSphere Automated Lab Deployment script for vSphere 6.5. In the past I have run the 6.0 script successfully. As part of the script, there is an OVA of a host profile that William has made for the deployment, this is used for the configuration of the host.
    This particular time I came across an error right after starting the process and immediately after connecting to the nesting host.  It was a bit of a strange error, pointing to the Import-vApp cmdlet but also saying, “Invalid URI: The hostname could not be parsed,” which sounded as though to be a DNS issue, I spent a little bit of time going through my DNS settings, making sure that the computer from which I was running the script was able to resolve the hostname. I moved off my MacBook using PowerCLI Core and tested from my Windows machine using PowerCLI 10.0, and received the same error.

    I did some quick research and found nothing related to the specific error message and started to look at it piece by piece. I decided to pull apart the OVA file and try and run just the OVF – SUCCESS! There appears to be an issue with the OVA and the Import-vApp cmdlet in both PowerCLI Core and PowerCLI 10.0. I am yet to test the OVA in vSphere via the WebClient, but I suspect it may work as it should.

    To pull apart the OVA, I recommend using 7ZIP and opening the .ova file and copy/paste the content.

    1. Download and Install 7ZIP
    2. Relaunch explorer
    3. right click OVA file -> 7ZIP -> extract to /<foldername>
    4. check for the VMDK, OVF and description file are all present
    5. Change your ESXI $NestedESXiApplianceOVA= to the .ovf file
    6. rerun script.
  • Configure PowerCLI and PowerNSX on macOS

    A couple of months back, PowerShell Core on Mac and Linux became mainstream after success of its beta. This has allowed for modules to be extended to also be cross-platform for many products out there. The two main products I want to cover are the PowerCLI and PowerNSX and installing from the Powershell Gallery.
    To get started, you will need to go to the PowerShell github repo and download the PowerShell install package that is right for your system.
    Once the package is installed, Open up terminal and type pwsh to launch PowerShell.
    The next Module you will need to install is PowerCLI 10.0 which is the full feature install.
    In your PS terminal, insert the below

    PS>Install-Module -Name VMware.PowerCLI -Scope CurrentUser

    If you receive an invalid certificate error, you can bypass this by using the below.

    PS>Set-PowerCLIConfiguration -InvalidCertificateAction Ignore
    To confirm the Module is installed, you can run Get-Module VMware.PowerCLI 
    Lastly, you will want to install PowerNSX, there is whole site full of information regarding PowerNSX and how to use it, 
     
    The Easiest way to Install powerNSX is to run:
    PS>Install-Module PowerNSX
    PS>Import-Module PowerNSX
    Again, to confirm installation, run Get-Module and check if PowerNSX is listed.  You should something like below.
    Screen Shot 2018-04-06 at 12.39.20 am
    That’s it, PowerCLI and PowerNSX are now installed.
    To keep the versions up to date, you can run the Update-Module cmdlet.
    PS>Update-Module VMware.PowerCLI
    PS>Update-Module PowerNSX
  • You, Your Health and the Datacenter

    Just yesterday I finally completed a marathon few of months in downsizing a live environment in one of our datacenter. This was a huge project with a very ambitious deadline that still required time spent in the office each day doing BAU. To put my workload into perspective, BAU contains customer support tickets that usually role into the next day and so on. In itself, just to keep on top of that is full time, now adding in a large datacenter consolidation with multiple parties involved more than doubles that workload.
    Like any project, there are lessons that are learnt and usually incorporated into the next project. Some of the mistakes that we make are ones that are obvious and just plain common sense, but due to our own determination (or should we say, stubbiness!) we tend to make them without realising.
    One of the biggest mistakes I made during this project was looking after my health. I pride myself for the fact that I don’t get sick (aside from the minor runny nose or cough) but the reality is, is that we are not invincible. A weeks back, we had a nasty virus go around the office,  I was just coming off a large stint of after hours work and being physically drained and surprise surprise, I got sick. I was so sick that I ended up taking days off which is a big deal for me. I then had a week where I took it steady and paced myself, then came the last couple of weeks and I went in guns blazing feeling on top of the world to meet the deadline. Unfortunately, I pushed myself hard, I did 60+ hours in 4 days, I started Sunday and finished Thursday morning. I would go to the datacenter, get a large amount of work done, then go home for an hours sleep, get up, get my daughter ready for the day and go to work. I would then go home and have dinner, put my daughter to bed and go back out to the datacenter, I started to make simple mistakes, but pushed on. Come Friday, I got sick again and over the next 4 days, I lost 4kgs and I only weighed 70kg to start with.
    This week I spent several days in the Datacenter to complete the project, this time I put my BAU on hold so I could pace my days and get a good night sleep to limit the mistakes to almost none.
    The project is now completed and the biggest lesson I have taken away from this is to look after yourself and know your limits. We all strive to be the best we can, we want to show our peers that we can do almost anything to get the job done, but the risk we take is dangerous. The percentage of mistakes we will make are greater the more tired we become, ranging from possible customer outages through to  causing physical injury to yourself or others.
    So, from my recent experience, I have compiled a list of things that I think are vital to try and keep yourself happy, healthy and on top of your game.

    • Take regular breaks and keep water intake up:
      When working in a datacenter, you are in a dry environment where you are constantly moving between cold and hot aisles. Ensure you keep your fluids up, you don’t want to suddenly collapse from lack of hydration in the middle of the datacenter.
    • Ensure you get plenty of sleep and pace yourself:
      No project or job is ever worth your life. When you are tired you will make mistakes that can either impact the company or may cause an accident where yourself or someone may get injured.
    • Don’t be afraid to ask for help:
      If you find yourself running out of time, or being unable to complete all the tasks or just need a moment to take a breathe, Ask for help. There is no shame in needing assistance. We are all human.
    • Plan to spend time with the family:
      I cannot stress enough that spending time with family was a necessity to stay happy and to stop the mind focusing on the work that was ahead. Clearing the mind is essential for when you are back at the task and needing to focus.

    If you can stick to these guidelines, you will not only succeed at your project, but you will be happier and healthier at the end of it. If you have a peer you are working with, take the time to remind them every few hours to take a quick 5 minutes break, it could be the difference between working on another project with them again or not.