Category: Veeam

  • Backing Up with the Veeam Agent for Linux

    Backing Up with the Veeam Agent for Linux

    When new products are released, we generally see other products in the line up being updated with new features and improvements. We saw quite a number of new features added to the Veeam Agent for Mac. During the Veeam v12 launch where the focus was on Veeam’s new Data Platform, Veeam Warranty and Veeam Backup and Replication v12, there was also some other products that received updates and new release numbers and in among those was the Veeam Agent for Linux v6.

    Over the years, Linux has grown in popularity in the desktop world and new distros continue to pop up, but in the enterprise space, Linux continues to dominate, whether it be as a virtual machine or a bare metal appliance. Regardless of what the distro is used for and it’s underlying hardware\hypervisor, it still needs to be backed up. Your data is important. So, with that said, let’s dive in.

    Installation

    So this is something very easy, especially if you have any Linux skills. You will first want to make sure you check the release notes to ensure that you have the a supported distro (or flavour) of Linux. All the main distros are there; Ubuntu, Debian, RHEL, SLES, and many more. You will also want to make sure that all you have all the required dependencies. If you are are planning to backup to a Veeam Backup and Replication or Cloud Connect Repository, you must target VBR 12 or higher. Head on over to the downloads page over at Veeam, here you can grab the latest and appropriate version for your distro. Again, make sure you have all the required dependencies and have read the release notes so you can familiarise yourself pre-install.

    In the below, I will be installing on Pop-OS, a distro based on Ubuntu/Debian with a desktop environment, so I will be installing the .deb package and using the Apt package manager.

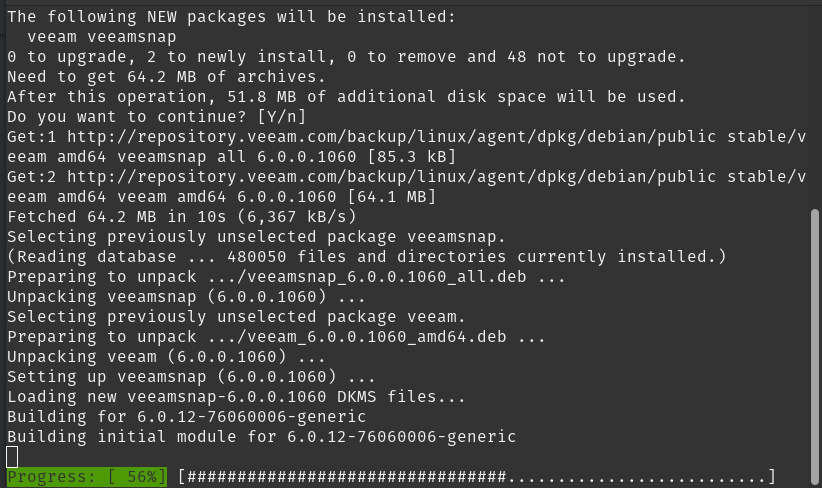
    Once the package has been downloaded to your preferred location, open up terminal (If you didn’t use wget or another terminal based download method) and set your new core directory to that folder. Once in the path, you can run the dpkg install line and then update your apt repository. Once the repository has updated you can go ahead and install Veeam.

    # cd path/to/folder

    # dpkg -i ./veeam-release*

    # apt-get update

    # apt-get install veeam
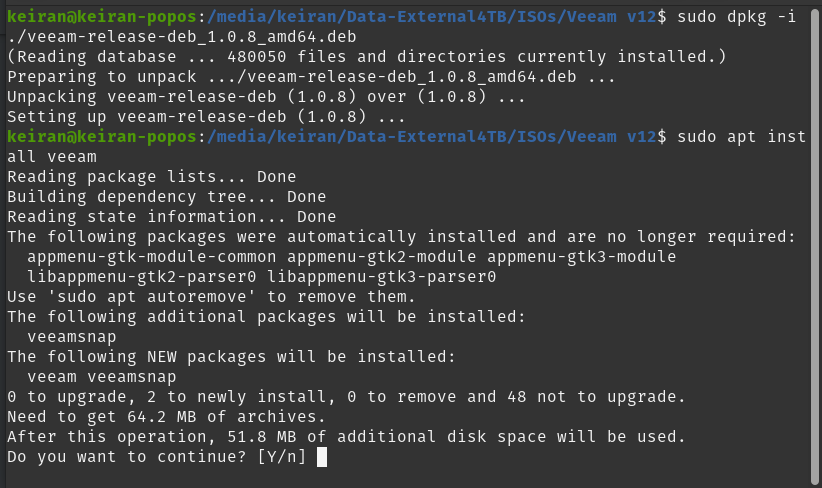
     

    As soon as the install has completed successfully, you can go ahead and launch Veeam. This will bring you to a ELUA splashscreen that you will need to read and accept to continue. You will then be able to move on and configure your first backup job.

    $ veeam


    Backup

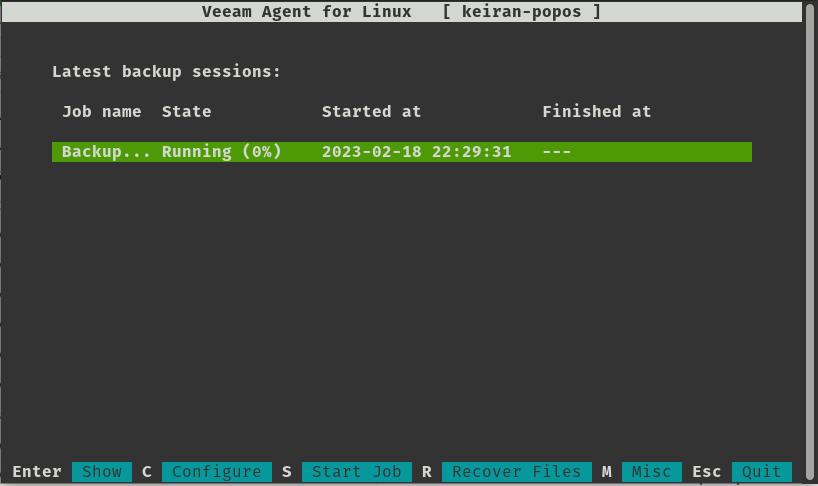
    Using the keystrokes, you can navigte around the menu. c will take you to configuring your first backup job.
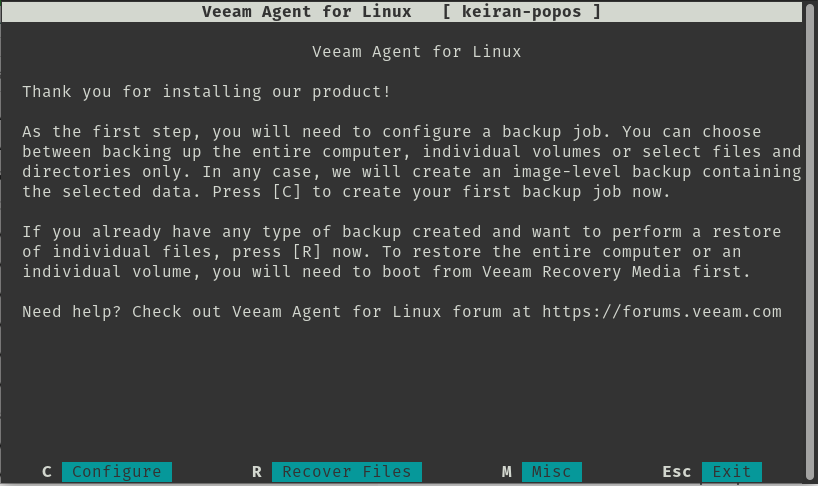
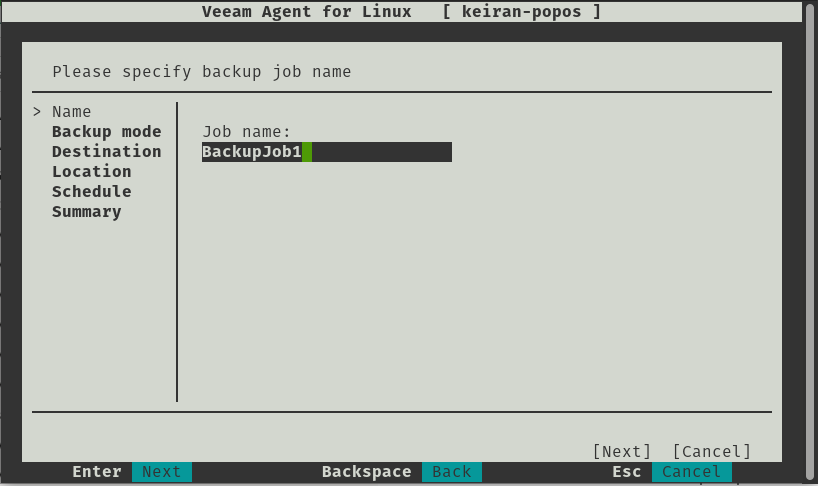
    Configuring a job is very straight forward and easy to navigate, you have a plethora of options for destination, retention and how you want your files backed up.
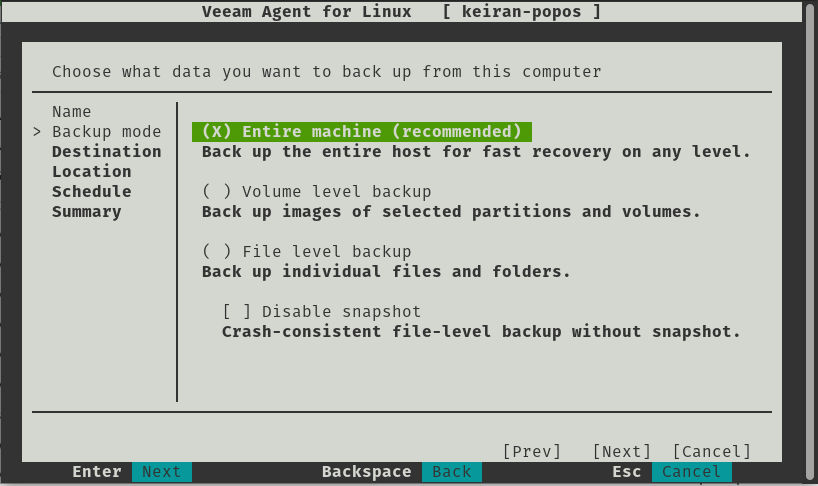
    As mentioned, you ahve a number of options in how you would like to back up your files. You can select from either backing up the entire machine, volume level backup, file level backup and the additional option to disable snapshots giving you a crash-consistent file-level backup without the use of snapshots.

    • Backup Entire Machine
      • With this option, you will be able to take a complete in-place backup of your system, allowing you to either restore specific files, or restore the entire system back to the last backup. This includes all partitions. If you run something like df – h  Here you can see the list of all the partitions that are mounted.
    • Volume Level Backup
      • In this option, you can select the volumes that you would like you backup to take a copy of, for example, if you only want a copy of your data drive or partition without the system root or swap partition, you can select just the data drive.
    • File Level Backup
      • Here you can select specfic folders and file in which you want backed up. This is a great option if all you want is to back up your desktop and document folders.

    Only one option is able to be selected.
    The destination is a very important selection, if you select a local storage device that is built into your computer, than you may have trouble if there is physical damage to the machine. If you were to select a local drive attached, you will need to ensure that the drive needs to be removed safely, and stored in a safe place.  Shared folders allow you you to be able to backup to an SMB or NFS share, this allows you to select a destination that might be in another room in the house, or allows your backup to take place over wireless so you can be sitting in any room of the house working away while the backup takes place. Backing up to a Veeam Backup and Replication repository is similar to a shared folder, however you have more control over the backup and it is easier to mount from within the console in the event you need to restore – The Linux agent version 6 is only able to connect to VBR v12 or higher.

    It worth noting that the above options are avilable in the free version, however there are also 2 other options available with a valid license. Object-Storage is becoming increasingly popular and there are many vendors that offer both an on-premises installation and a cloud hosted option. With a license you will be able to backup to an object storage repository, or utilise Veeam Cloud Connect and backup to a service provider – both for off-site copies.
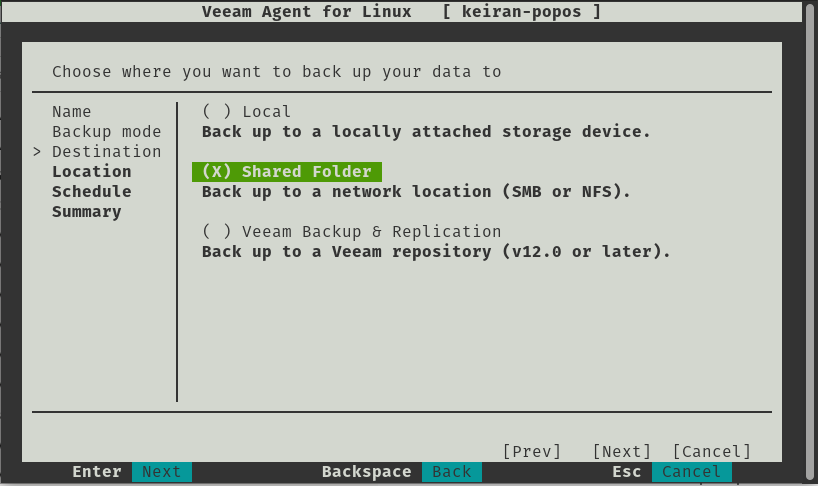
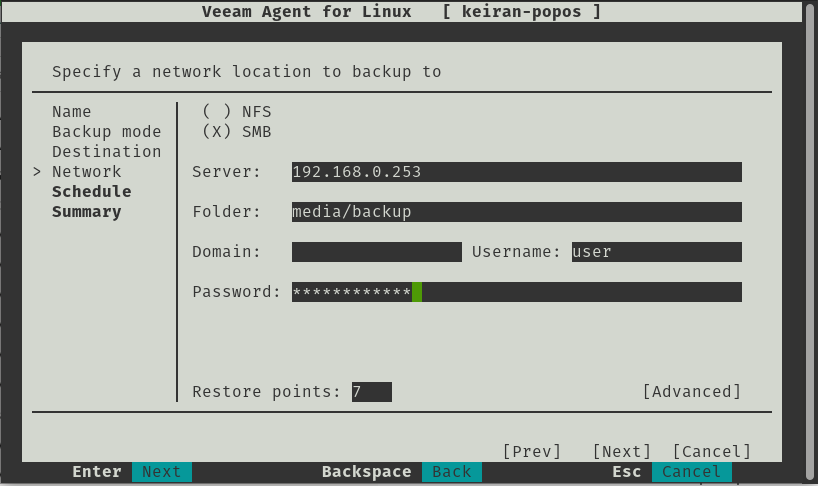
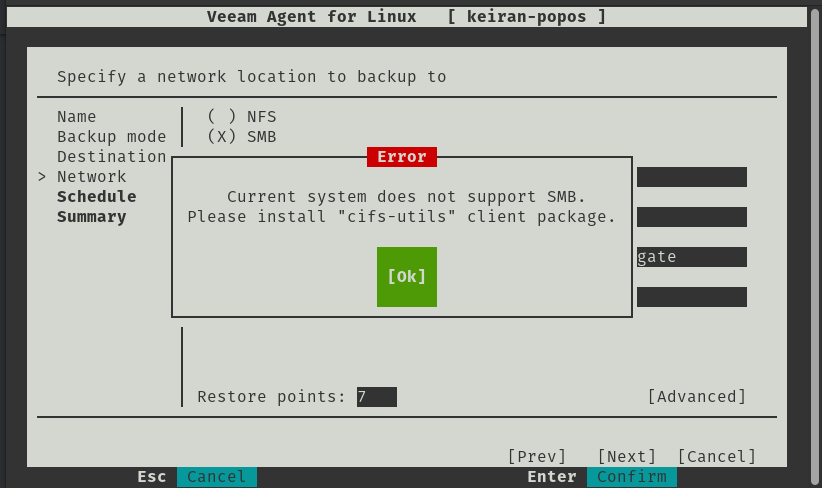
    If you attempt to run the SMB share, you may run into an issue where an error message advises that the “Current System does not support SMB” – This is an easy fix and you just need to install the cifs-utils package and once installed, you will be able to continue on with the setup.

    # apt-get install cifs-utils
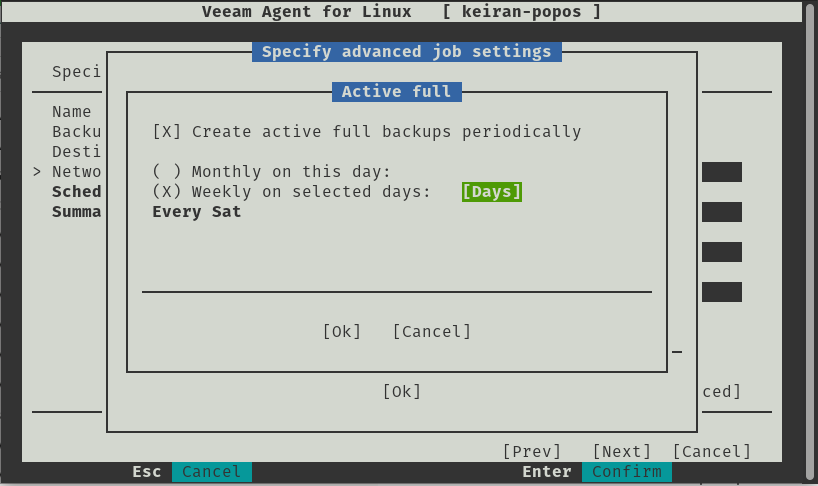
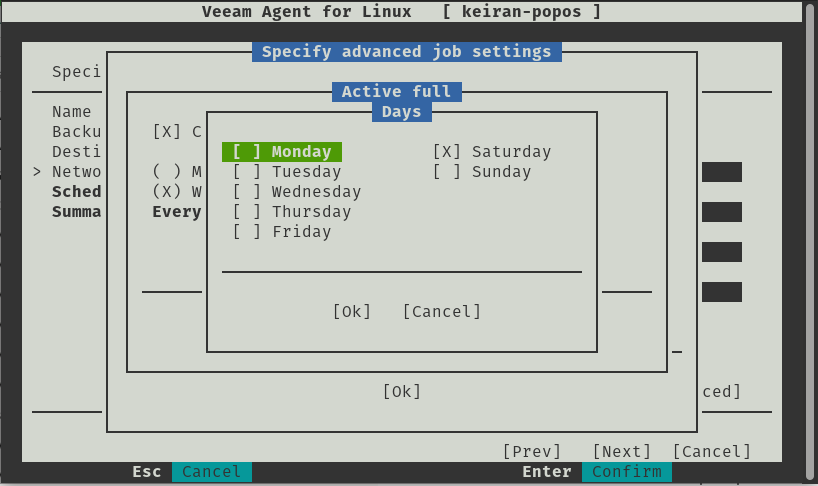
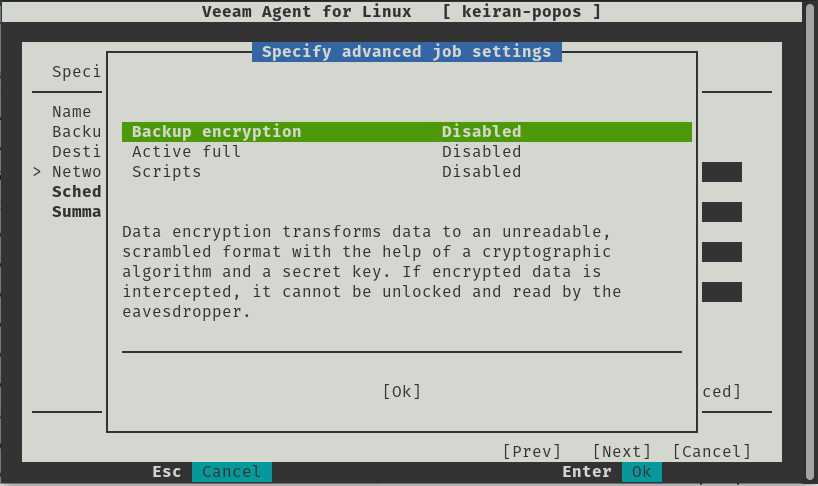
    When designing your Backup and DR plan, it is crucial to plan for how long you need to retain your restore points for. The type of restore points is also as important, whether you want all incrementals or a full created once a week, but planning from the beginning can save pain later on. With the Linux Agent, you have the option to enable Active Full and set a schedule for how often you would like the process to run. Veeam also offers some other advanced features when configuring your backup job. Encryption is certainly important, especially for sensitive data, and Veeam’s gives the option in the free version to add an encryption password, but make sure you save that password somewhere secure otherwise your backup will be scrambled and unreadable.  You can also run scripts after the restoration.
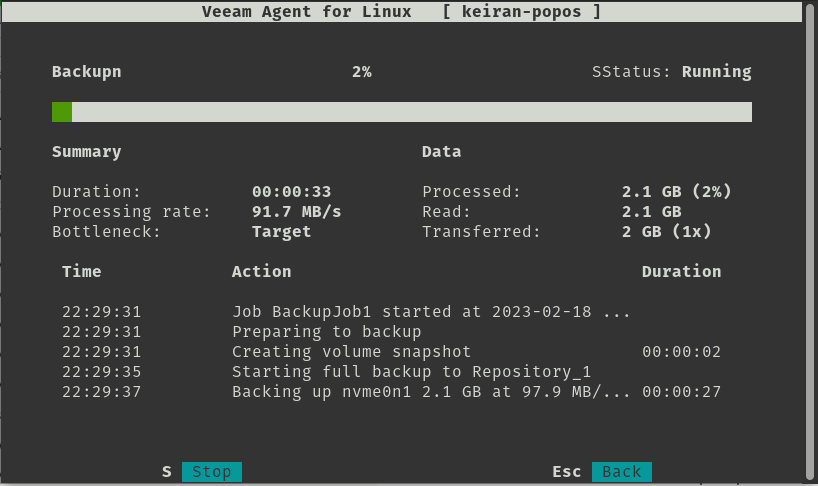
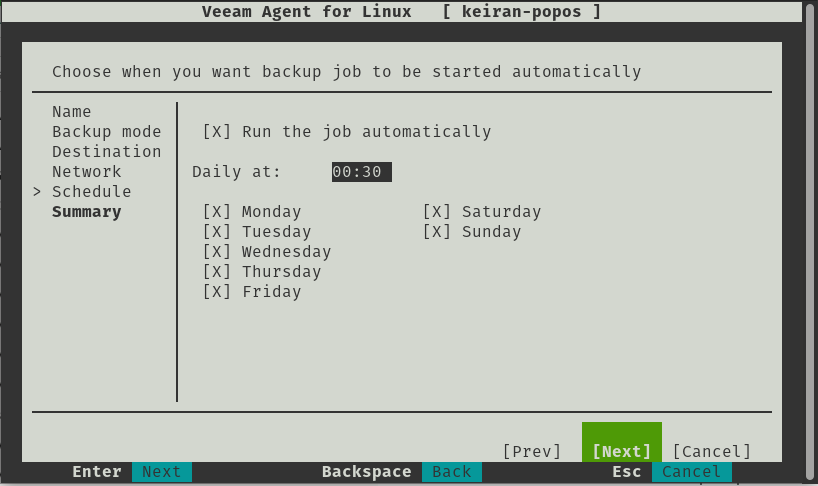
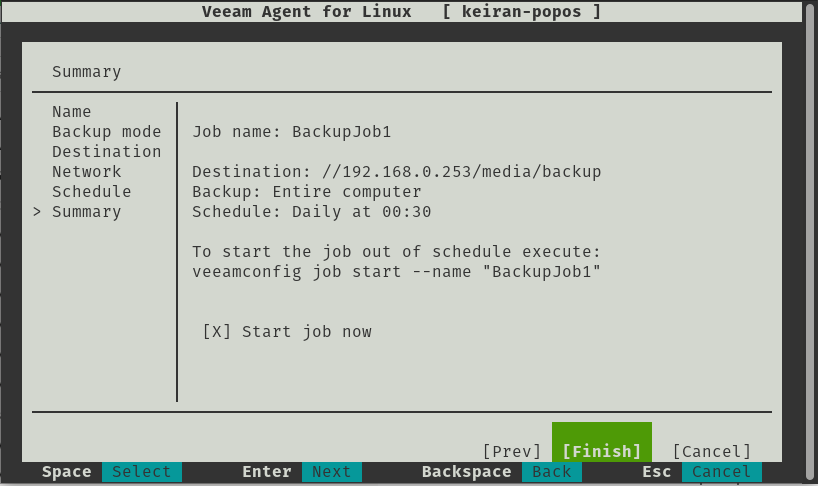
    Simply, the last two options allow you to set your schedule, what time and what day would you like your backup to run. Once you’re happy with that you can review your backup configuration and continue – if you desire, you can start the job immediately.
     

    Restore

    This is where I felt the product really shined, as much as having an easy backup with a lot of options to make it as efficient as possible, if you can’t access and restore your data then why are you even bothering with a backup?

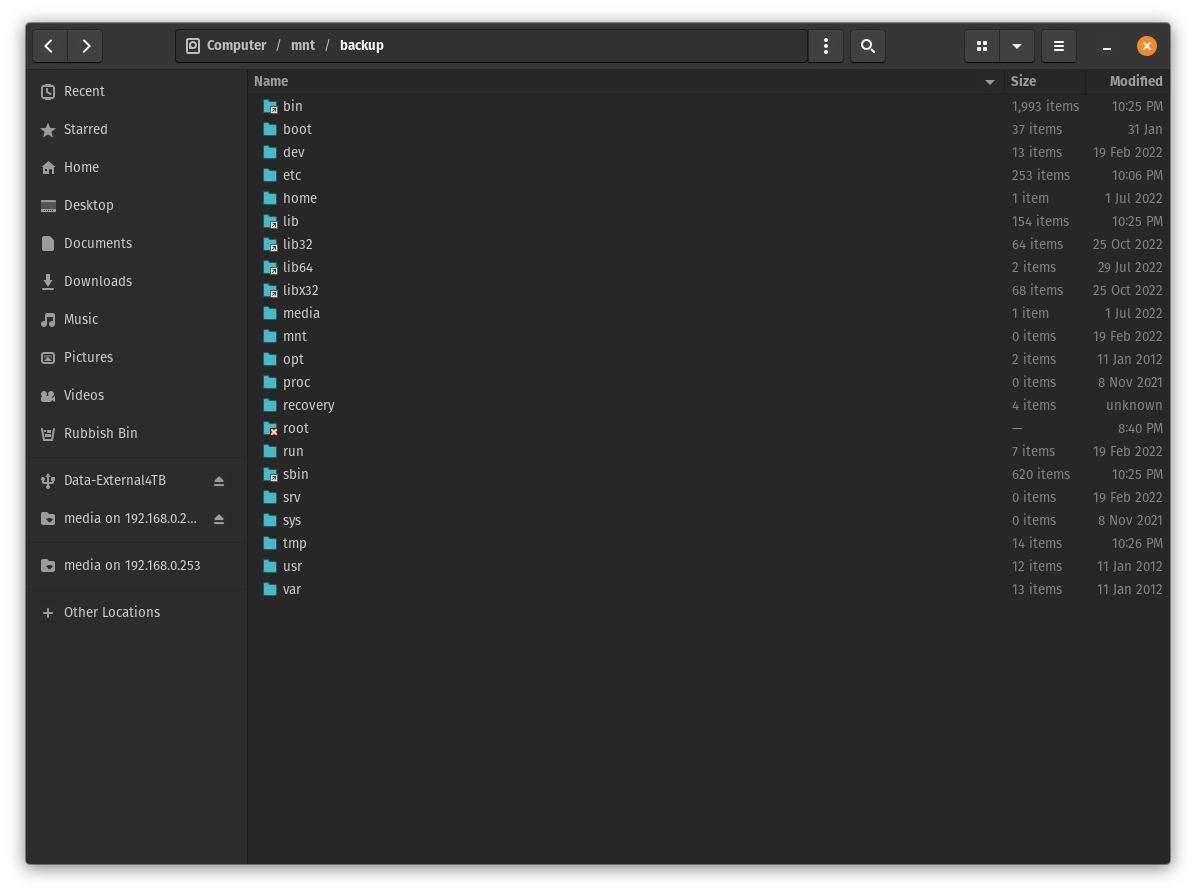
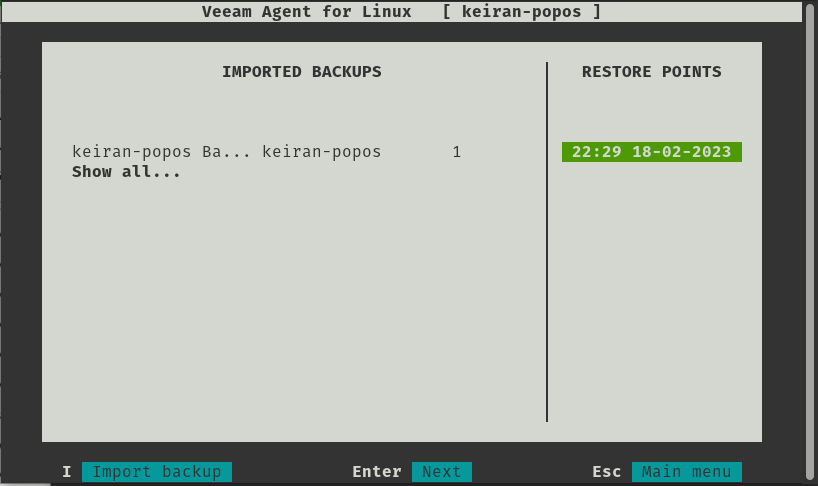
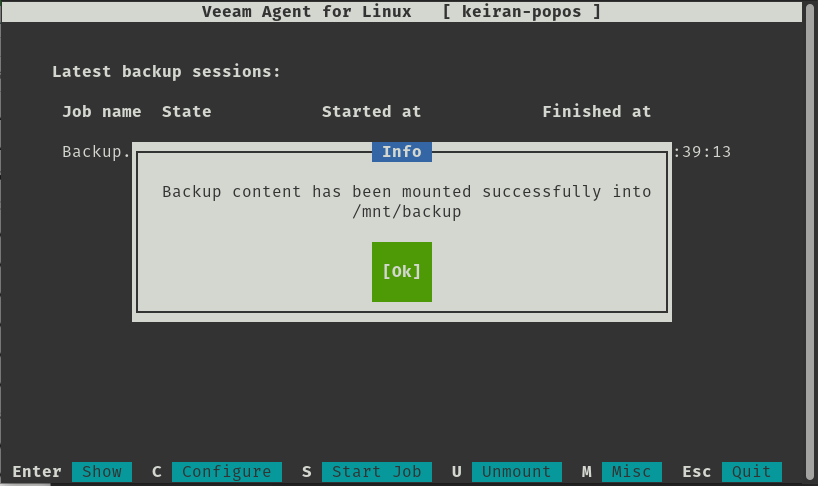
    Once the first backup has been successful, select R for Recover Files takes you to another screen that displays your backup jobs and their restore points. Once you select a restore point, your system will mount that point to /mnt/backup and from here you can fully browse your backed up files. If you are using a desktop environment, you can open this up in your file manager, and if you are using all cli then you can navigate to the mount point and copy the files as required.
    It really is that simple.

    Conclusion

    Another great product, not only because it does exactly what it is meant to, plus more, but it is also free with a limited set of options. Veeam have really put a huge effort into making a great backup tool so easy to use on Linux. Yes, there are a number of dependencies that are required, but that is just Linux, and majority of them are already installed. Hats off to Veeam for sticking to making another easy to use tool, and also for making it freely available.

  • Introducing Veeam Mac Agent v2.0

    Introducing Veeam Mac Agent v2.0

    Over the years we have seen Veeam release some great products, and with each release they continue to build in more and more features and there is no exception when it comes to the the updated release of the Veeam Agent for Mac v2.

    Like the Windows agent, the latest Mac agent is available as a standalone install. The previous version was completely managed from Veeam Backup and Replication where you had to cut a config and package the install. With v2, you can install straight from the pkg file allowing you to have more control and freedom.

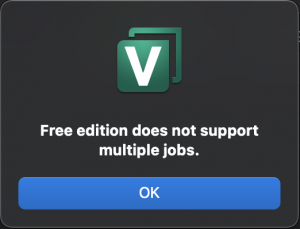
    Like the Windows and Linux agents, Veeam is providing the Mac agent with a limited free license which allows up to 1 job created and limited backup locations. However, it still has a ton of functionality and gives you access to backing up either individual files, directories or the entire computer.

    So let’s dive in and take a look at what is available under the free license.

    Straight off the bat, there is a really nice UI to work with, the layout is easy to work with and everything is very much self explainatory. There are heaps of features that are wrap into this tight little bundle and are easily accessible. The locations in the UI make sense are all in logical locations.  I did, however struggle to find how to delete the job as my instict from using other Veeam products was to Right click > Delete . This was simple enough in the end as it was just in the top menu, which I guess just makes it safer.

    Backup

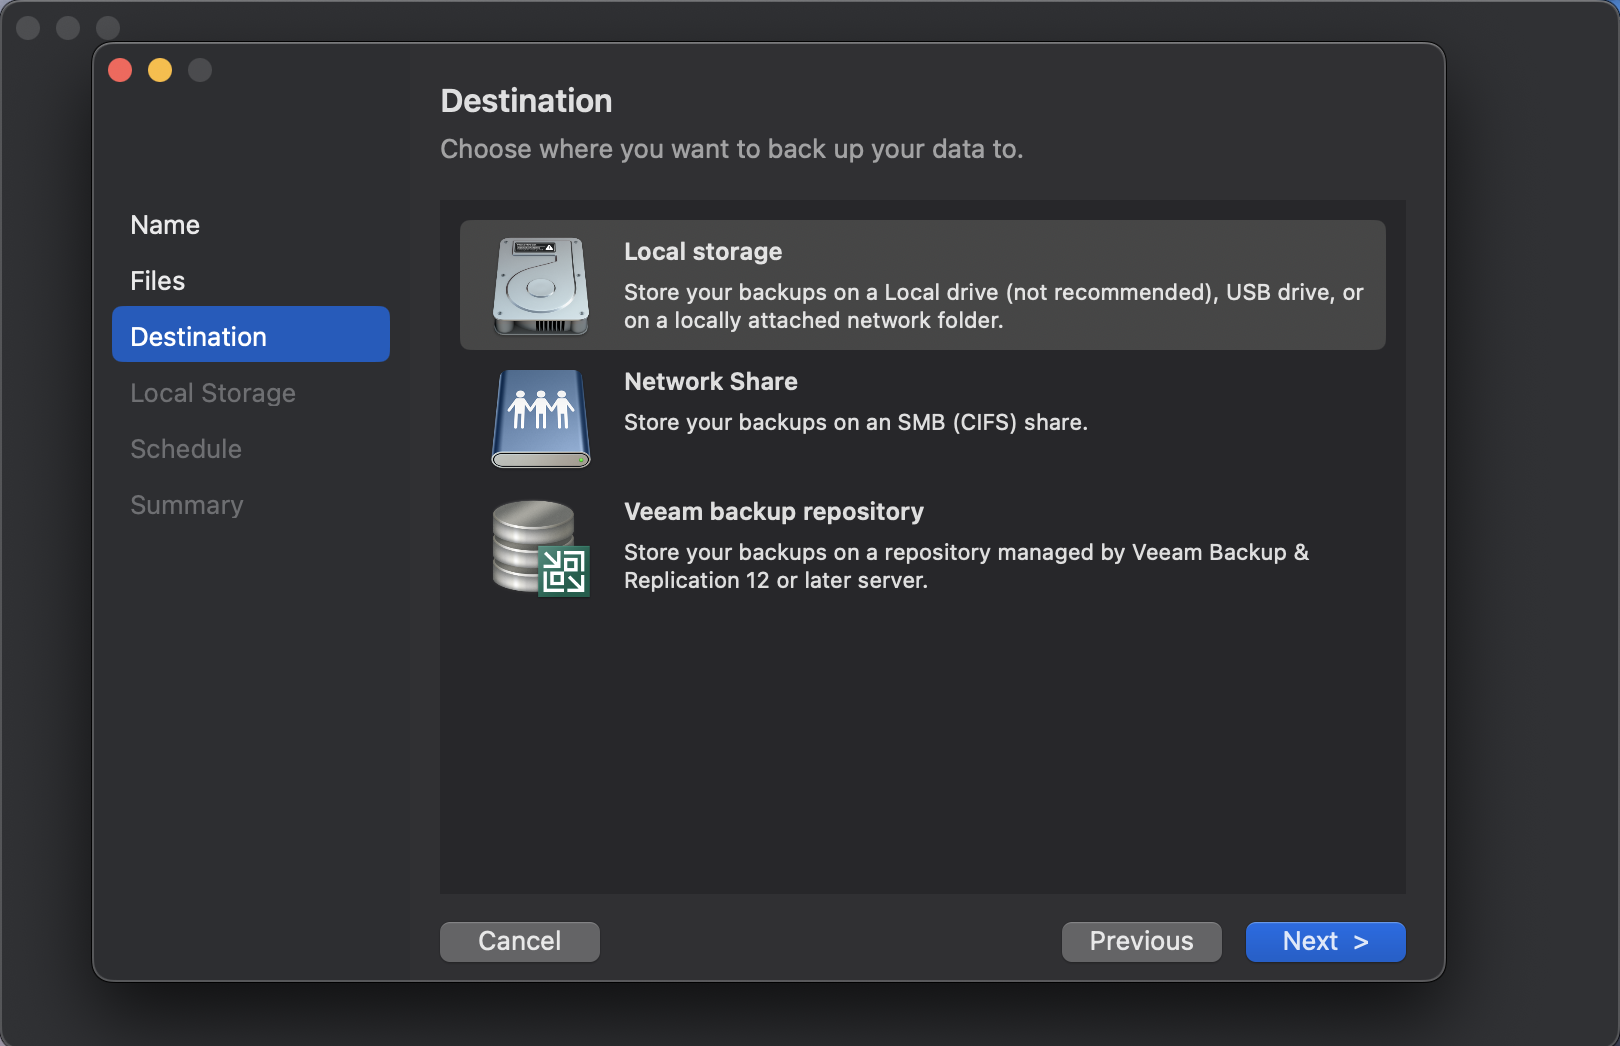
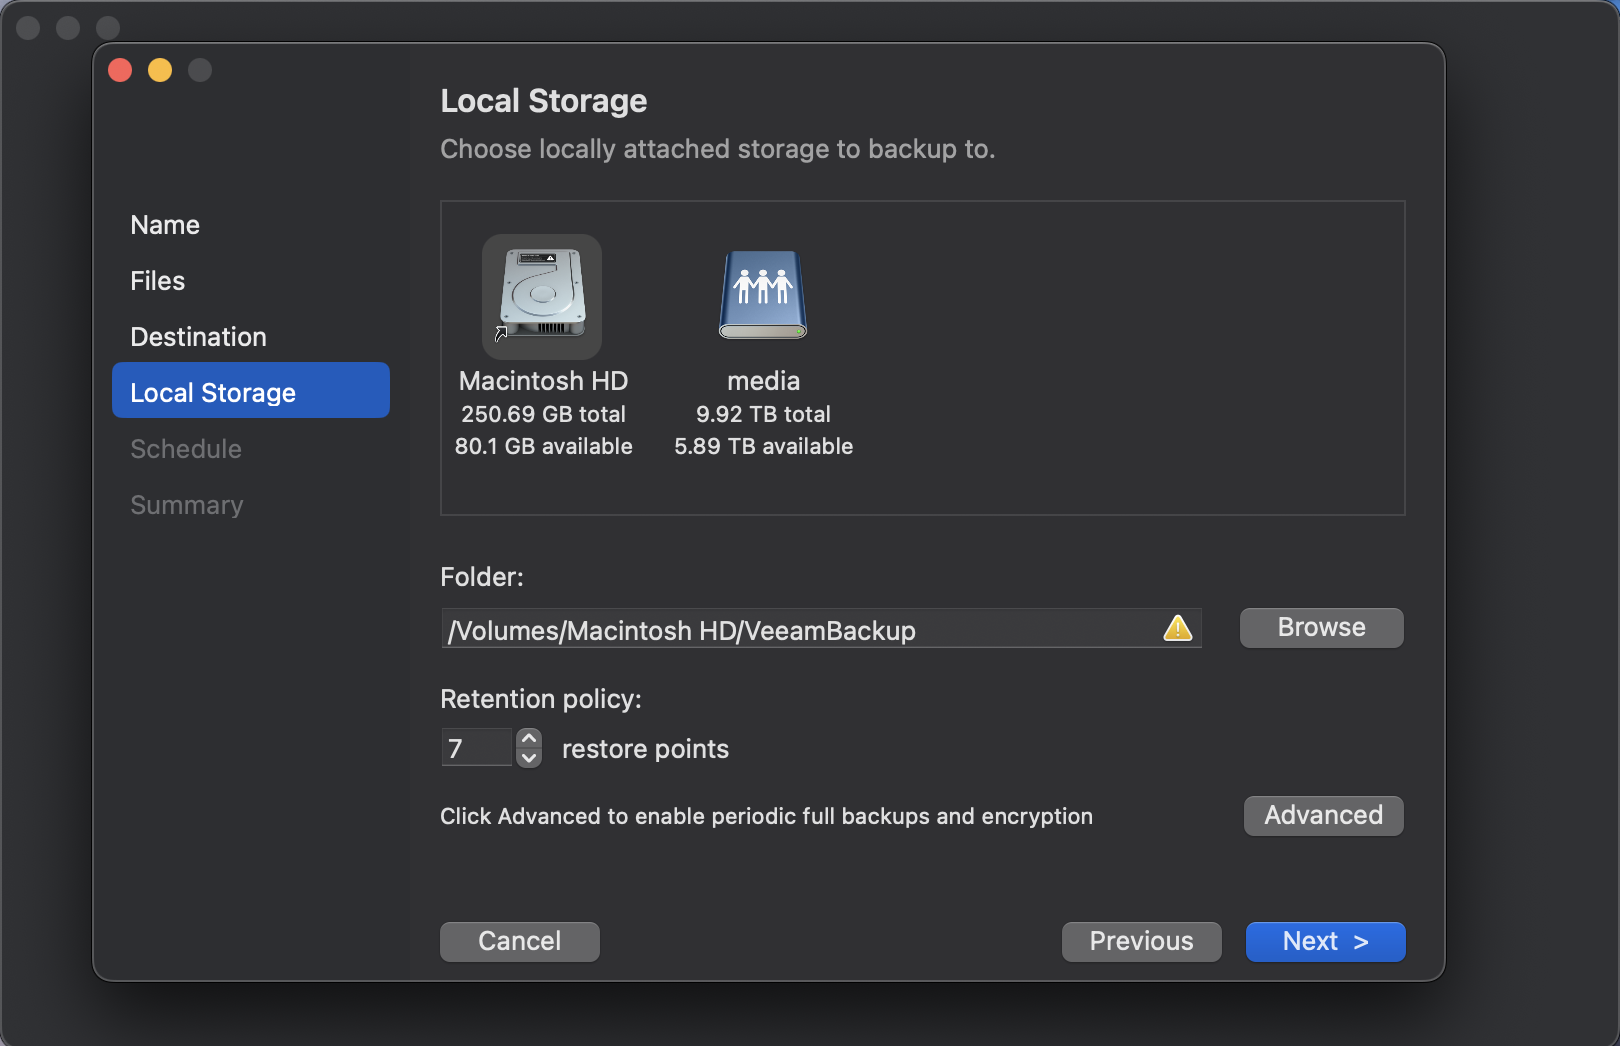
    As mentioned above, there is a number of new repositories that are available for backing up your workstation to. Previously you were limited to only backing up to a Veeam Backup and Replication repository, but the Mac agent has now been extended to locally connected repositories and SMB shares.

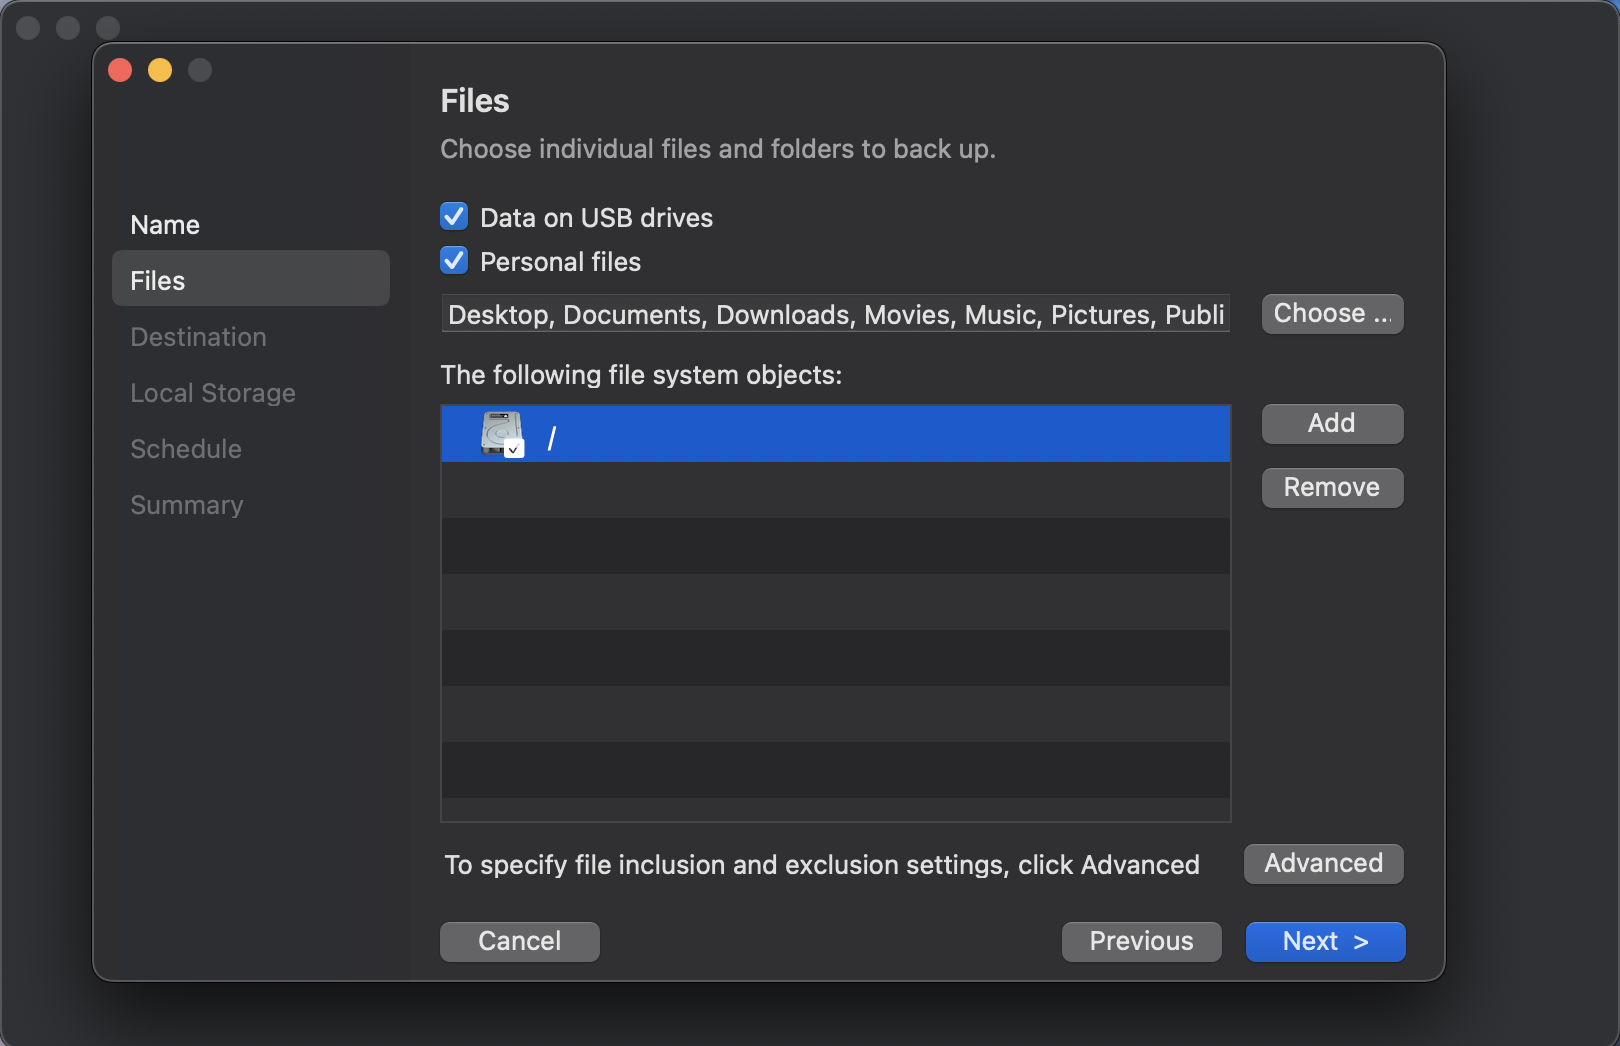
    Some people like to only backup certain files and others prefer to backup their entire directories and Veeam knows this well which is why they give you the ability to choose your precious files or your entire root/sub directories.  You can even enable backing up locally attached USB drives in case you have an external drive that holds other working files.


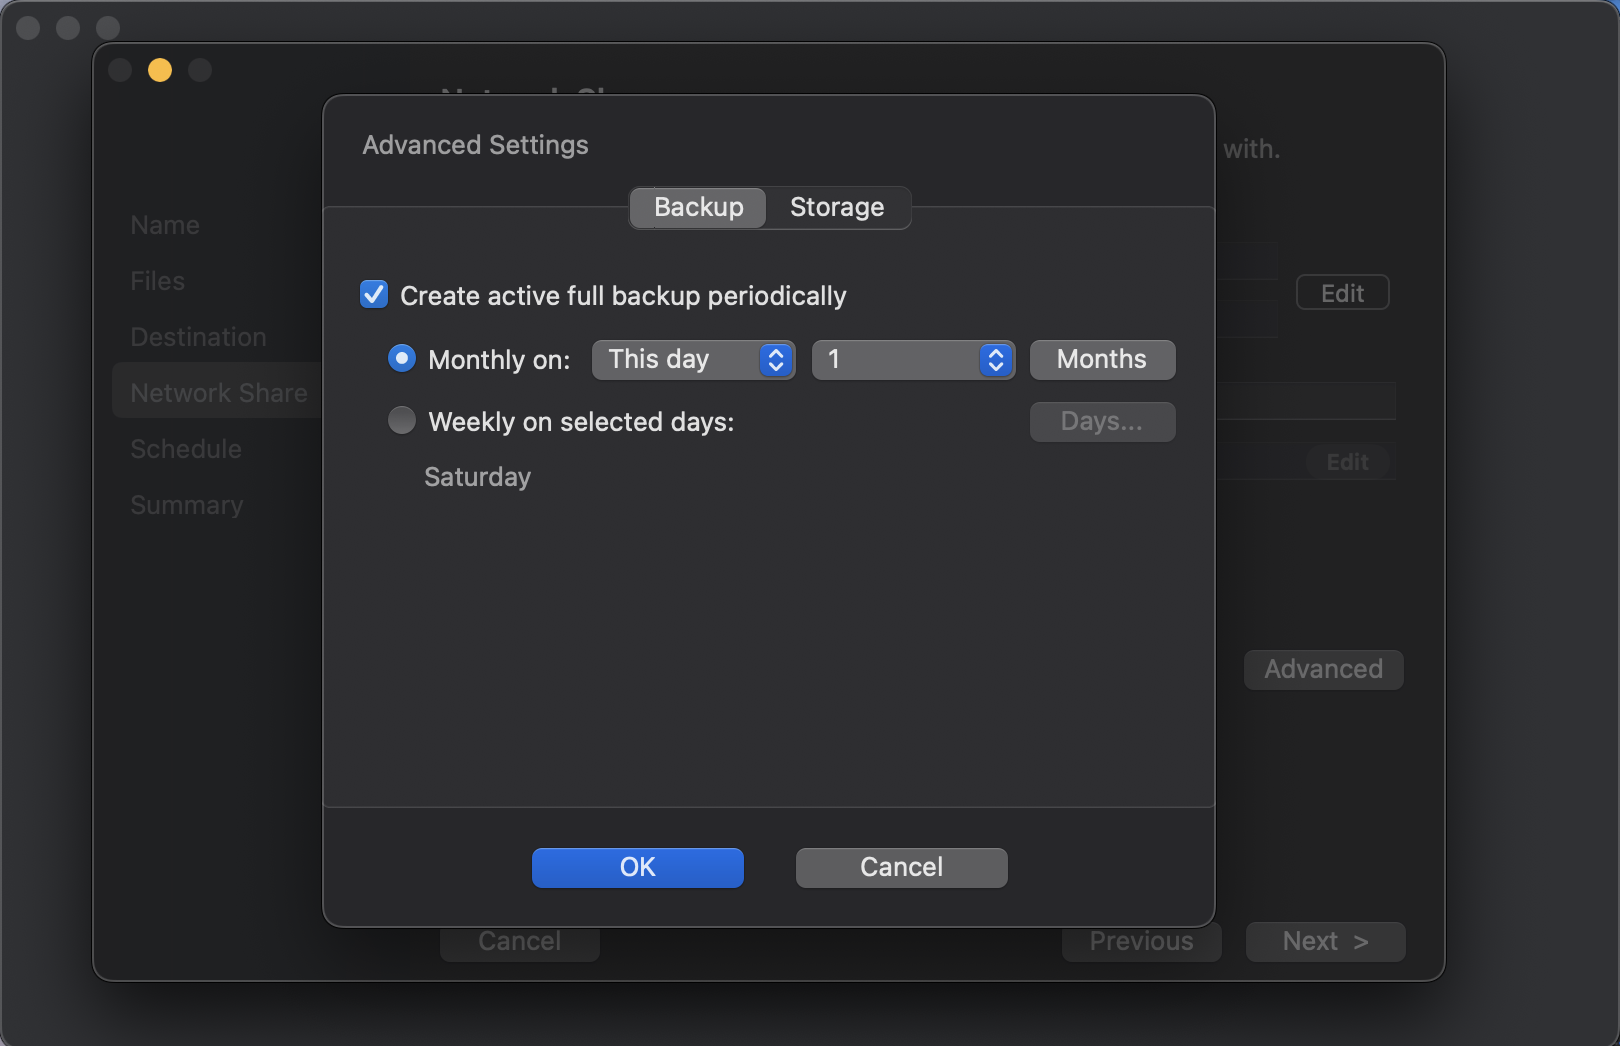
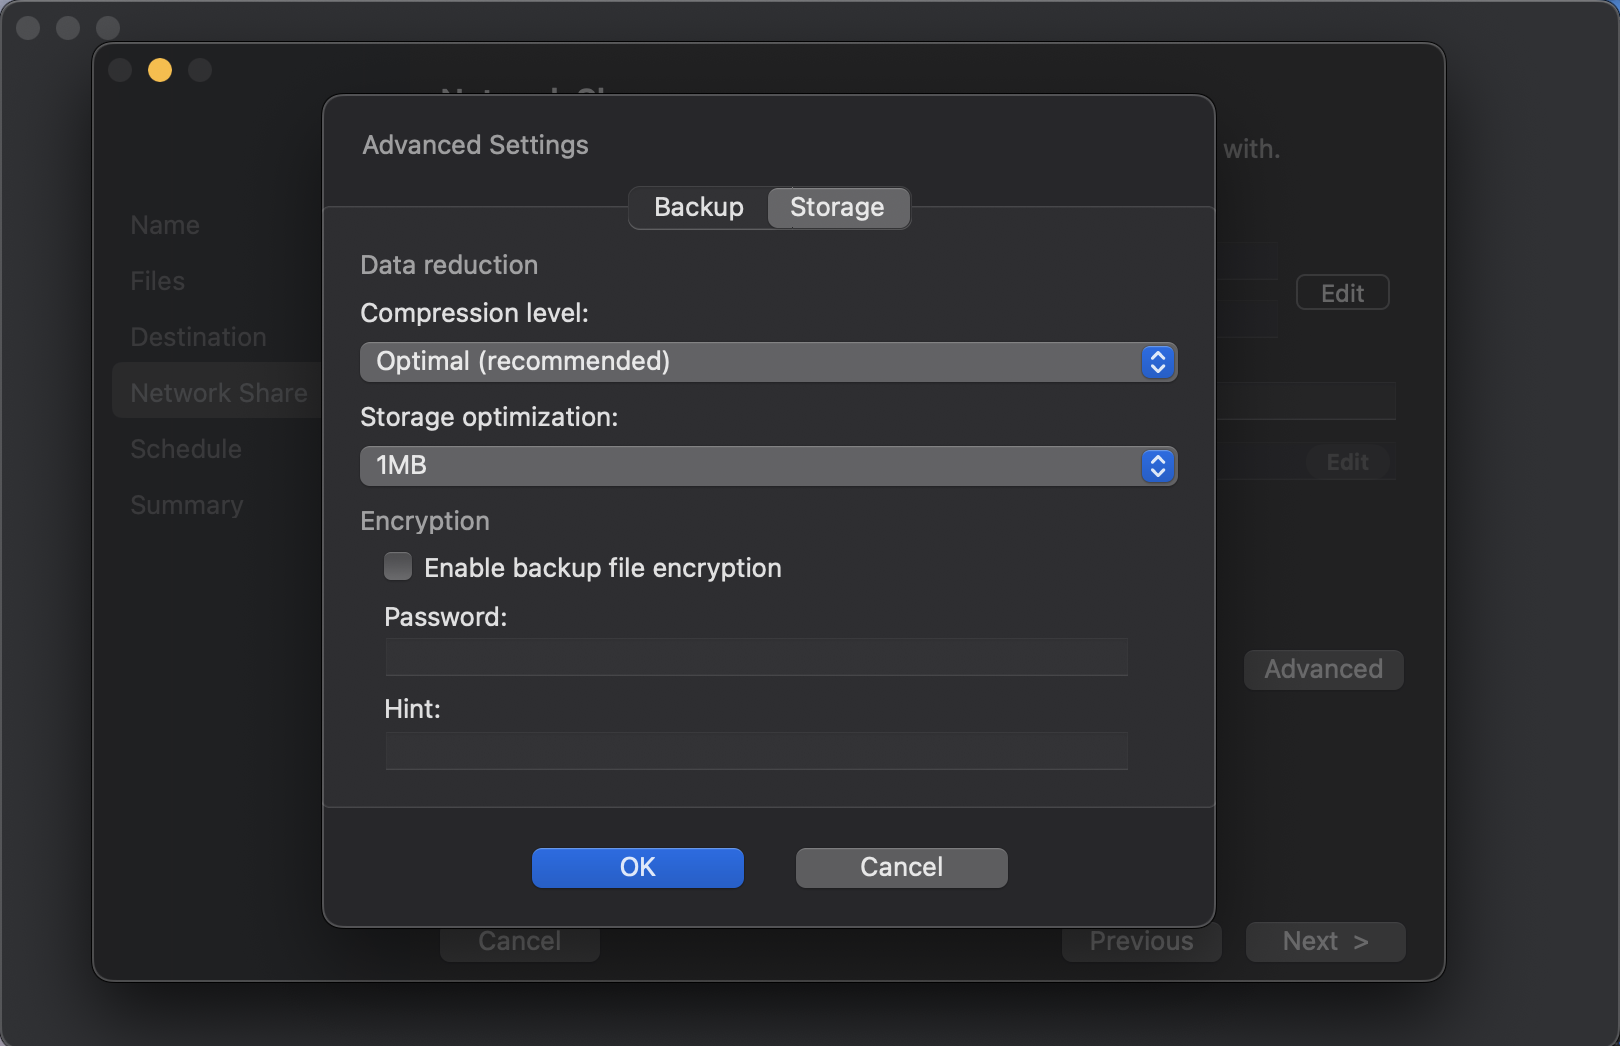
    The Mac agent is still quite packed full of features and functions to ensure you get the most out of your backups. You have access to advanced features, such as; Active Full backup schedules, Compression, Storage Optimizations and Encryption.


    Restore

    What’s the point of a backup if you’re never able to restore from it when you need to? While dealing with enterprises, we always say to have a test plan in place, but I feel fairly certain that a lot of folks wouldn’t have one in place for their home network. we should also remember to treat our backups as a copy of our data and not as the only copy.

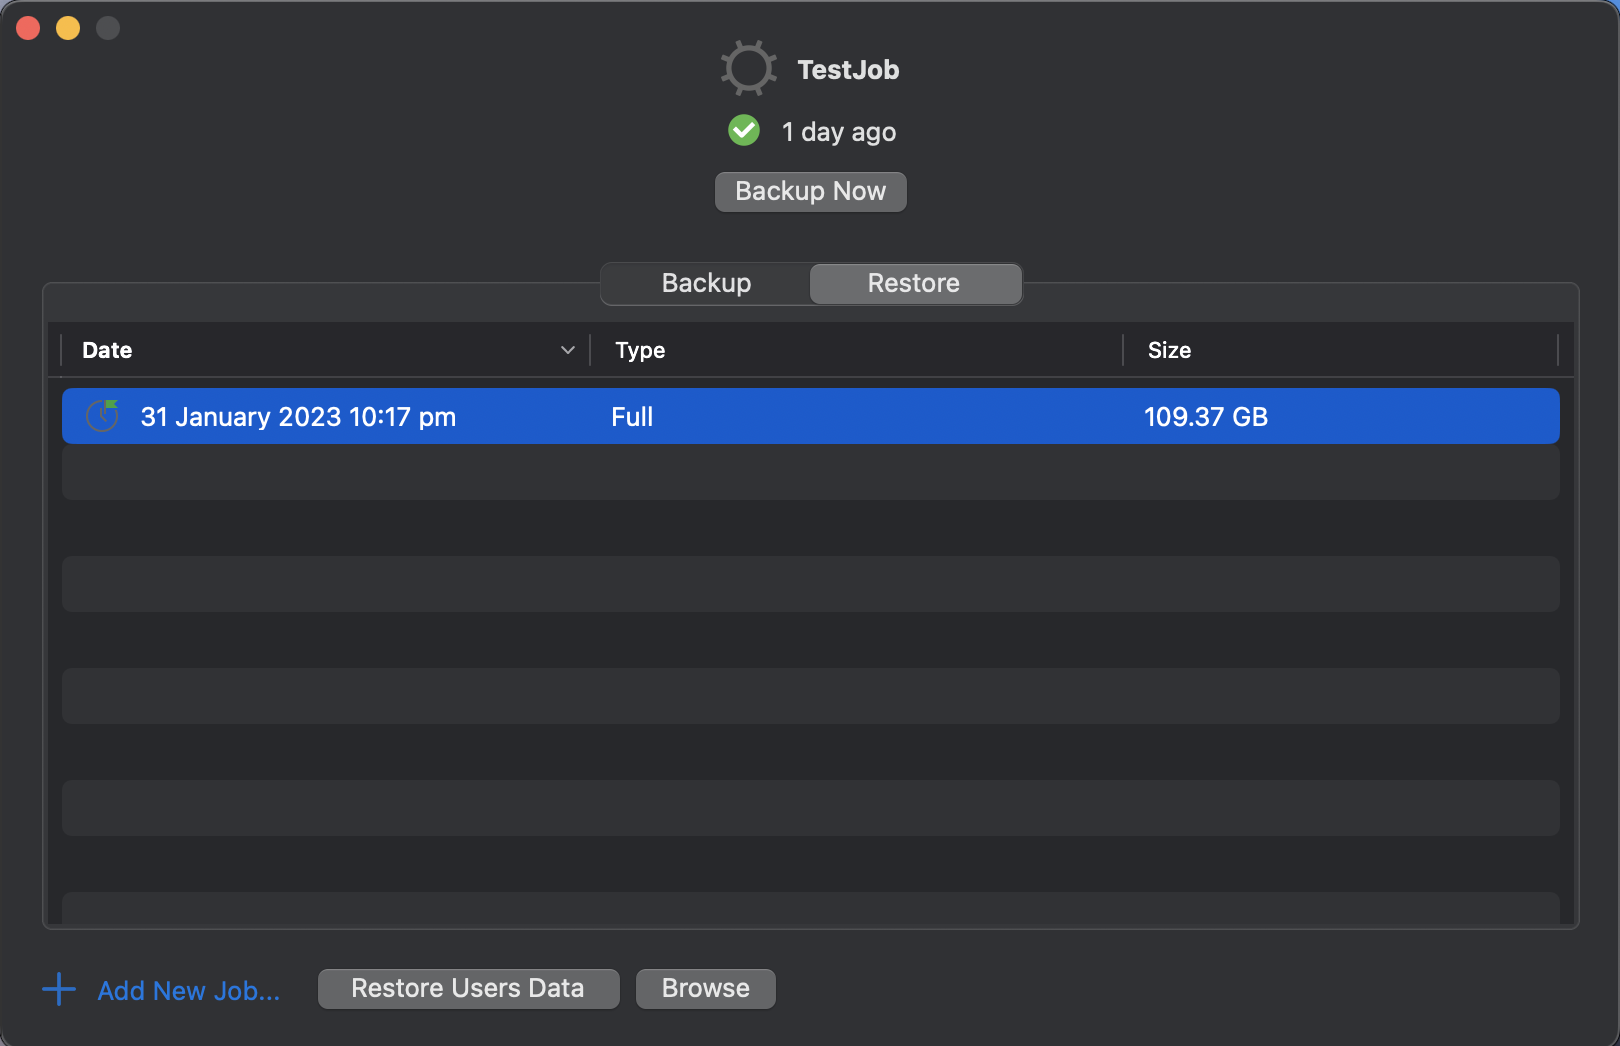
    The Veeam Mac Agent makes restoring a very easy task. Click on the restore tab, select your restore point and then browse your backup. Simples.

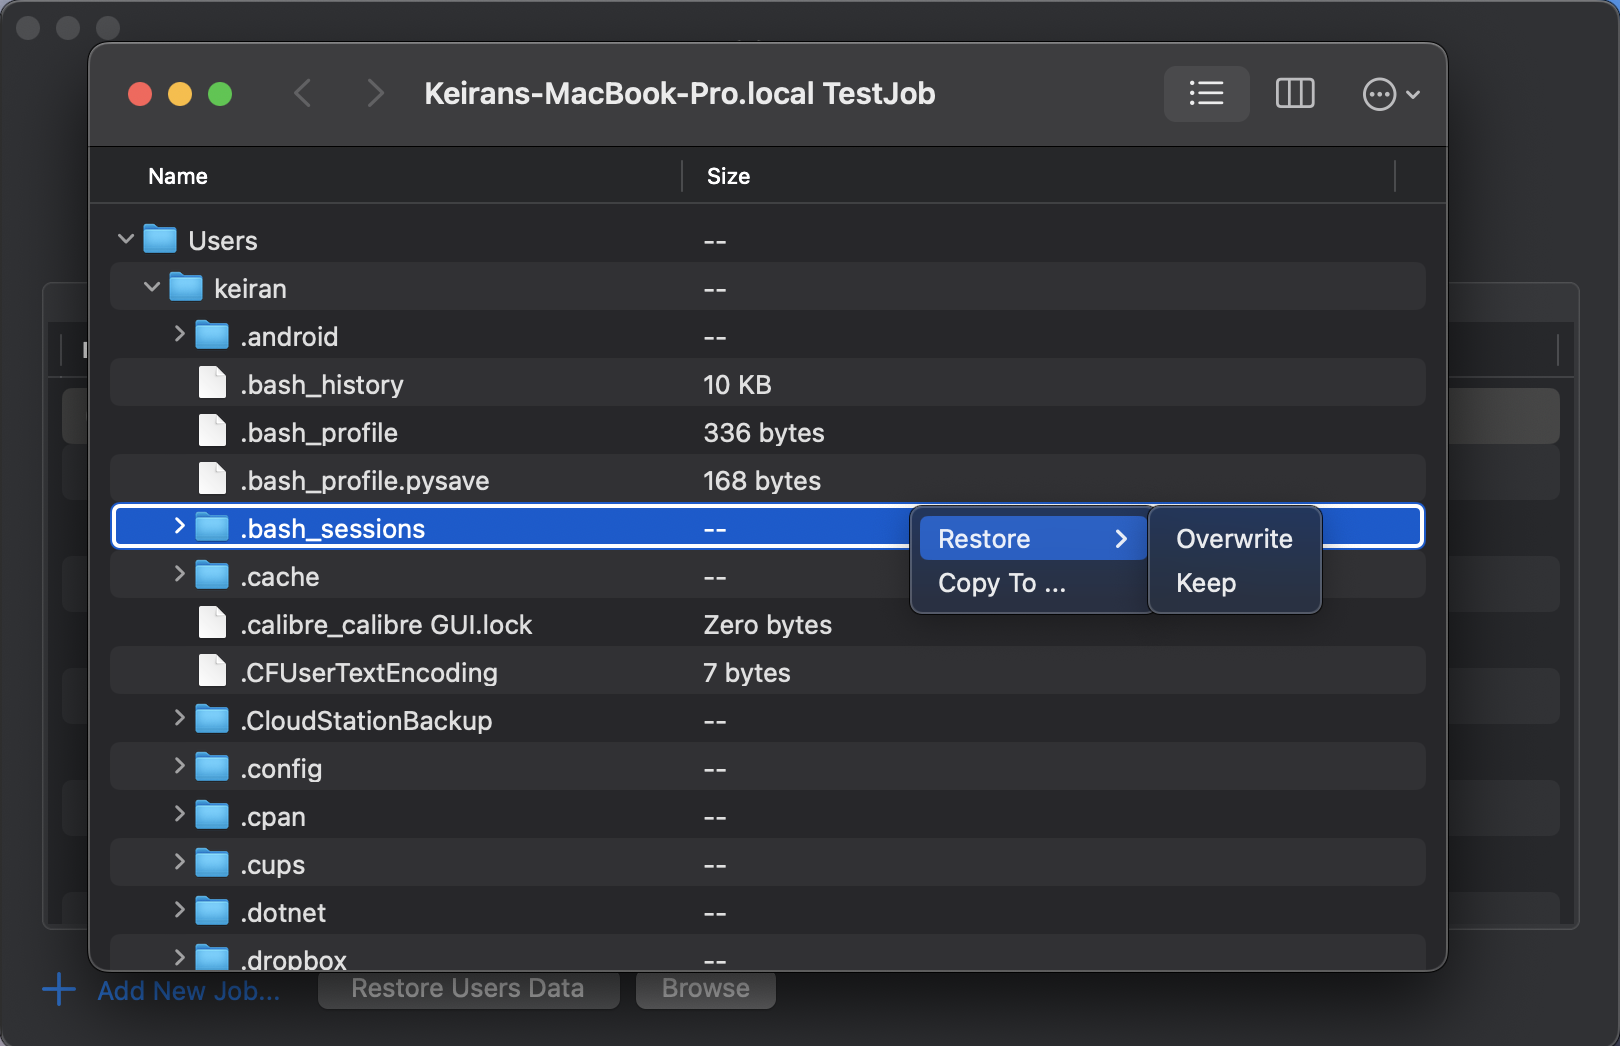
    Just like restoring in Backup and Replication, you can choose to either OVERWRITE or KEEP your existing copy of the document (Keep is usually ideal so you can check your restored copy first).  KEEP will place a second copy in the same directory and rename to <filename_RESTORED_date&time> so that you will know exactly which copy it is. There is also COPY TO which will allow you to restore to another location – This is great if you want to place the restored file on an external hard drive or in another folder.


    If you choose the “Restore Users Data” option, then you will receive a big pop-up to advise you that you will overwrite your User Profile. So, you have been warned!


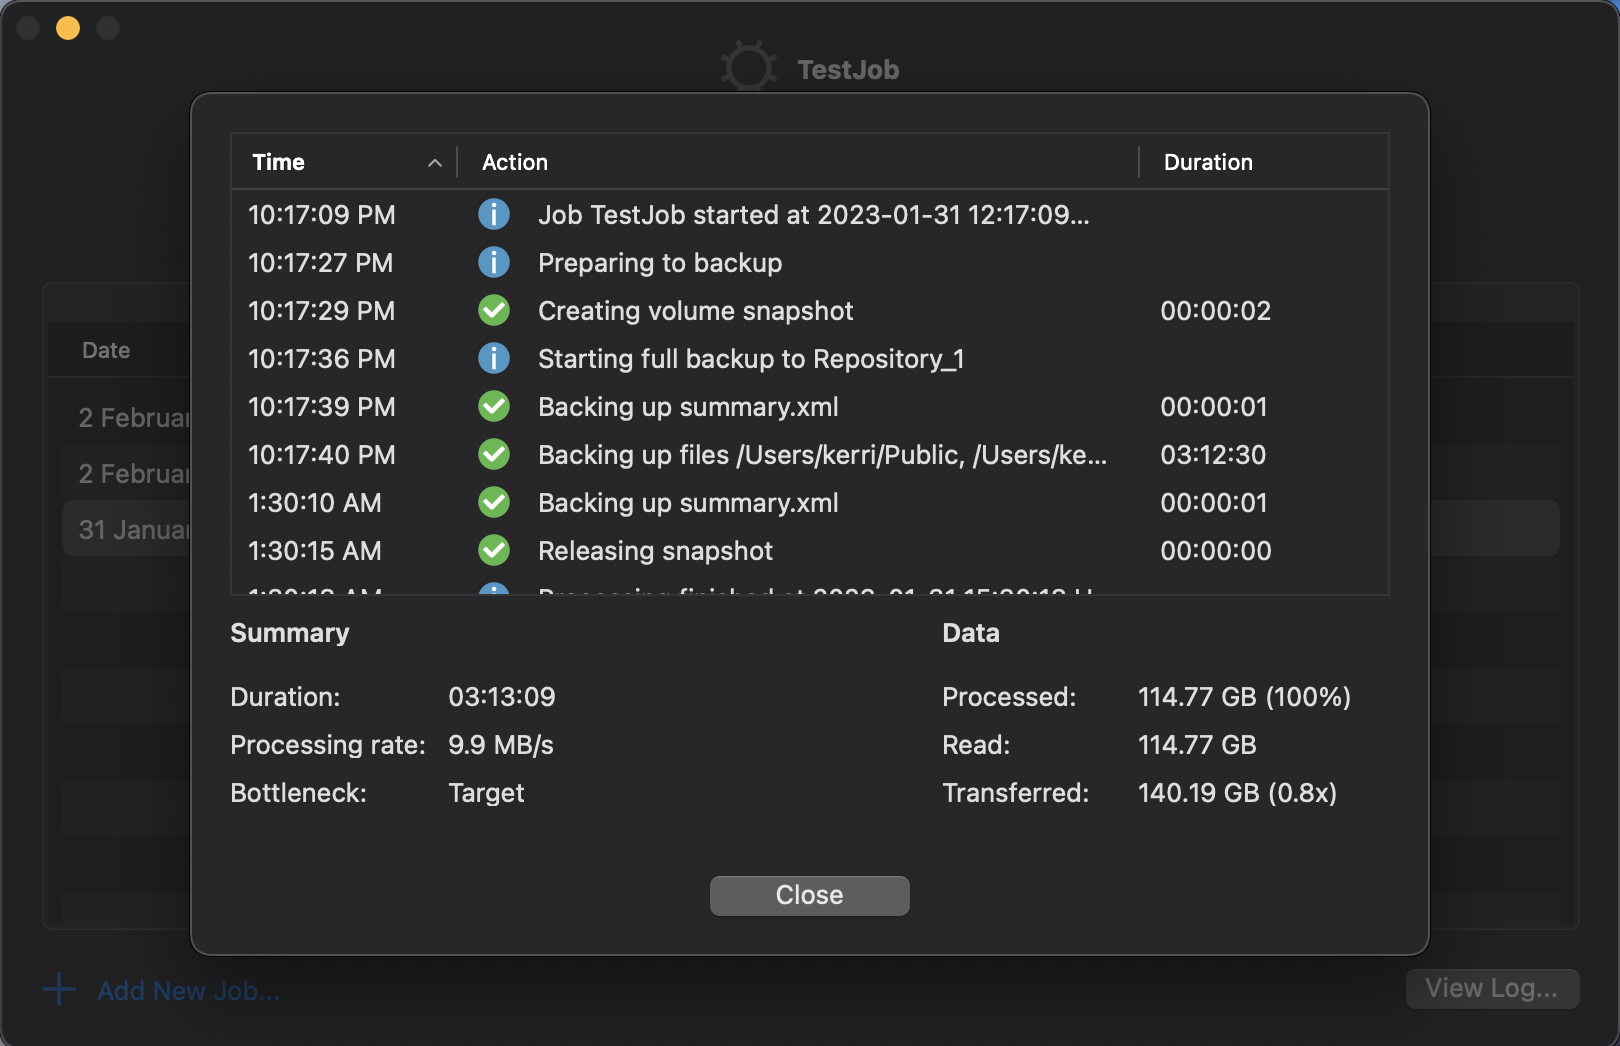
    Veeam have also done a fantastic job with their job logs and have a very detailed, but human consumable log output directly in the interface.

    Consclusion

    Yet again, Veeam have hit it out of the park with their products and to be able to provide a a free product that is packed full of features is very generous of them.  I think the Mac Agent has come a long way from v1 and is worth trying out. It certainly is a replacement for TimeMachine and much easier to understand and configure. I would like to see a few more menu items in the right click menu, but these are available in the Apple top bar, so no real issues there.

    Make sure you check out the new Veeam Mac Agent once it is GA and be sure to check

  • Veeam Announcement Round Up

    Veeam Announcement Round Up

    So mark today as a good day as two announcements from Veeam have surfaced. I’ll start with the minor announcement and move onto the good stuff so you will read the full post.

    Veeam 9.5 Update 4a. 
    That’s right, 2 months after releasing the GA of Veeam B&R 9.5 Update 4, the next minor release has surfaced with some fixes as well as improvements.

    One of the bigger items on the list is the readiness for vSphere 6.7 U2 and Hardware Version 15. This means that the code has been tested against the up and coming update for vSphere.

    Second is the support for Microsoft System Centre Virtual Machine Manager 2019 

    There is a list of items in the release notes – Check them out!


    Veeam Backup and Replication Community Edition. 

    That’s right, Veeam have jumped on the bandwagon and release their Community Edition, allowing up to 10 VMs, Cloud Instances, Physical and/or Workstations to be backed up. However, the even cooler part is that you can even use this in production!

    The community edition is packed full of features, and you would think that there would be some that were missing, but that is surely not the case here. Veeam is putting it out there for you to get your hands on and to build your environments and see the full potential of Veeam B&R.

    You can get started with Veeam B&R:CE here 


    So that’s it for now, very quick overview announcement, but there is tons of information in the links. Go and check them out and get your hands on some awesome products!

  • Veeam Backup & Replication 9.5 Install – Back to Basics.

    Veeam Backup & Replication 9.5 Install – Back to Basics.


    Sometimes it is good to go back to basics, somethings change between different versions of software and the installation process isn’t always the same. Sometimes, you may have never installed that piece of software before, but the only installation guide is 3 versions in the past and they have since introduced the need for IIS for a new web portal or something. So here we go in the first post of my new Veeam series “How to install Veeam Backup and Replication” 

    1. Download the latest Veeam VBR ISO from the support download page. 
    2. Depending on version downloaded, you may need to extract the ISOs from the ZIP
    3. Mount the “VeeamBackup&Replication” ISO and open the setup.exe
    4. Click the install icon for Veeam Backup & Replication.
    • Read and Accept the EULA (You can’t proceed if you don’t agree) 
    • If you have a license file, attach it. Otherwise, you will get 30 days free trial
    • Choose your components to install. 
      • Veeam Backup & Replication– This is the main application for configuring and running backup & replication tasks.
      • Veeam Backup Catalog– Used to index the files into a GuestOS backup file for easy restoration. 
      • Veeam Backup & Replication Console– The console is the GUI used to perform tasks and configure Veeam Backup & Replication. 
    • The System Configuration check is used to ensure the correct components are available and installed ready for Veeam B&R to install and configure.
      If there are components showing as Failed, click on the “Install” button to get them installed.  
    • One installed, re-run the check and ensure each component passes. Click “next”. 
    1. Review the default configuration, this includes directory locations, ports and SQL instances. You can select “Let me specify different settings” if you need to make any changes. Click Install to continue. 
    • Wait until installation completes. The installation will take approx. 10 minutes, and if there is an update as part of the install, you will see this occur towards the end of the process. 
    • You will be notified once completed. 
    • Double click on the Veeam icon on the desktop to open the console and put in your Username and password and click connect.
    • By default, the Component update will open up and require you to run the update on any components that require it. They will be listed. Select and apply the updates.
    • Under “Inventory” > “Virtual Infrastructure” > select “ADD SERVER” > Select type of server (in this case, VMware vSphere). NB:You will need to run this process before you can set up your proxies.
    • Input your vCenter (or host) details for Veeam to connect to. 
    • Add your server credentials into the credential manager. 
    • Trust the certificate if it is Self-signed. Please see KB2806 regarding 9.5U3 self-signed Cert bug. 
    • Confirm settings are all correct and click “finish”. 
    • Confirm under “Virtual Infrastructure” > VMware vSphere” that you can see your vCenter hierarchy. 
    • Under “Backup Infrastructure” > “select Backup Proxies”

    • Add in your proxy server’s IP/hostname and a description
    • Add your credentials for the proxy server, or reuse pre-configured.
    • Wait for components to all install. 
    • Confirm the Proxy service details
    • Once you click “finish”, you will return back to the VMware Proxy screen, here you will be able to set your Transport Mode and Datastores. 
    • Select “Choose” for Transport Mode. This will show you a number of options with descriptions to help you choose the correct transport mode to meet your infrastructure requirements. If unsure, select Automatic Selection.
    • Once you continue on, you will have the opportunity to set up traffic rules where you can create bandwidth restrictions. Here you can get granular and create policies for certain IPs. 
    • Once you have finished setting up your proxy, you will then need to set up your repository for storing your backups and/or replications. Select “Backup Repositories” and Set up a new repository. Start off by giving your repo a name. 
    • Veeam offers support for a number of different types of repositories. Select the best option for your infrastructure. (This tutorial will just be a Windows Server.) 
    • Under “Server” choose the repository server from the list or click  “Add New…” server. Once added click the “Populate” button to see the capacities and free space available. Once identified, select the disk you want to use. 
    • In your Repository settings, you can setup the path for which you want your backups to go to. Once set, click the “Populate” button again. Veeam also offers Load Control to assist with your bandwidth and disk performance for your backups, use and adjust as required. 
    • With Windows Server 2016, Microsoft introduced ReFS, their new volume format that allows for greater capabilities. Veeam acknowledges these abilities and advises you of the benefits of using ReFS over NTFS.  *Proceeding will not prevent you from using the Datastore. NB: ReFS is reasonably resources heavy.
    • Under Mount Server, you can set which server will take the load when mounting a restore point with Instant VM Recovery, SureBackup or On-Demand Sandbox. If you have the ability to provide write caching for the mount server, you can enable vPower NFS Service to assist with those mount points.
    • Once all configured, the review stage will confirm if any of the additional components will need to be installed on the new Backup Repository. Once confirmed, you can apply and let Veeam set up the repository. 
    • During the apply process, you will be able to confirm all steps completion. 
    • Once your infrastructure is configured, it is down to business and time to test and create your first Backup job. Under “Backups”, Right click and Select “New Backup Job.” Set a Name and then select your Virtual Machines you would like to backup.  
    • Click recalculate to ensure the total size is updated to reflect the size of the disks to backup. You can also exclude objects from being backed up. 
    • Select your proxy, if you have a Proxy server setup, then choose that one. Otherwise, if you did not setup a proxy earlier, you can use VMware as the Backup Proxy, however this will be a slower process. 

    • Select your Repository for the backup job. In this screen, you can also set the amount for restore points you want to keep and any advanced settings such as additional scripts, Email notifications, backup modes (Incremental, Active Full, etc.) etc. 
    • The Guest Processing page is used to configure the backup job to leverage Application Aware processing and also file indexing and exclusions, and much more.
    • The schedule is fairly self-explanatory. Here you can configure how often the job will run and how many retry attempts before failing the job. 
    • Once all settings have been configured, apply the configuration and if appropriate, Run the job once created. 

    • Watch the progress and if there are any errors, adjust your components where required. 
  • Extended Unstun Times with VVOLs and Veeam Proxy Fixed in 9.5 Update 3

    Recently Veeam released Veeam Backup and Replication 9.5 Update 3″ This update has brought a number of fixes and additional features that you can read about in Anthony Spiteri’s post VEEAM BACKUP & REPLICATION 9.5 UPDATE 3 – TOP NEW FEATURES
    This particular release brings a welcomed fix for backing up VVOL backed VMs when using a proxy server. The symptoms occur when you backup a VM that is utilising VVOL storage and a proxy server with hotadd. The snapshot attempts to remove too soon before the HotAdded disk finishes its unbind process. When this occurs the VM can freeze anywhere from a number of seconds up to 80+ seconds.  These issues were not present when the backup proxy was on the same host as the VM that was backing up. The workaround prior to this release was to run in NBD mode which uses the host as a proxy and is a slower method.
    So, what am I looking for? The most obvious symptom is when your VM freezes and can not perform any actions, however performance graphs, etc all should a healthy VM. The other is in your VM log file, you will find a line similar to below. this is a standard line in your log, the difference is the the length of time the process runs for.  In this sample: 56 seconds

    Checkpoint_Unstun: vm stopped for 56223314 us

    In Veeam B&R 9.5U3, you can now add a registry value to set a wait time to allow the unbind from the proxy to complete before the snapshot is removed. to do this, open up your Veeam B&R server -> Open RegEdit -> navigate to:

    HKEY_LOCAL_MACHINE\SOFTWARE\Veeam\Veeam Backup and Replication\

    Create a new REG_DWORD: HotaddTimeoutAfterDetachSec
    Using decimal set your wait time (value) in seconds for how long you require.
    Once added, you can restart your server\services for the settings to take affect. After testing overnight with a few Backup jobs, I re-enabled all jobs to run through proxies and  have not seen any issues yet.