Tag: Microsoft

  • Veeam 365 – Missing Application Permissions

    Veeam 365 – Missing Application Permissions

    With technology ever-changing, and businesses continuously facing security challenges, services such as Azure and AWS need to keep on adapting and improving their security posture to ensure that they continue to protect their customers and services. While this is certainly the correct thing to do, it does sometime create issues for the end users or other applications that are making use of those services.

    If you are a Veeam Backup for M365 customer or user, you may come across the below warning messages when running a backup job. This is because Microsoft have made some additional security changes with different graph API access permissions. This isn’t really all that bad, minus the bits that have been skipped during that backup window, but it is extremely easy to resolve.

    12/02/2025 9:07:25 PM :: Missing application permissions: Exchange.ManageAsApp. Missing application roles: Global Reader. Public folder and discovery search mailboxes will be skipped from processing, and a shared mailbox type will not be identified.

    12/02/2025 9:07:25 PM :: Missing application permissions: ChannelMember.Read.All. Private and shared team channels will be skipped from processing


    To resolve this, all you need to do is run through editing your organization once again, and allowing to. update the application registration.

    You do need to make sure you still have the certificate in the cert store for which you used to create the application or recently updated with

    1. Right click on the organization and select Edit Organization


    2. Click Next until you get to the “Microsoft 365 Connection Settings” – Here you can select Use an existing Azure AD Application


    3. Your Username and Application ID will appear in the boxes. Here you will need to then select Install and select your certificate that you used to connect to the application when you either created or last updated.

      Ensure to check the  Grant this application required permissions and register its certificate in Azure AD box. Click Next

    4.  You will then be request to copy the code and go to https://microsoft.com/devicelogin and log in with a GA account to authorize the change

    5. Once Authorized you will then see the progress of the update.

    6. Once all updated click Finish. You can then go ahead and start the job and wait for it to complete.

    7. Once the job has completed, confirm that all was successful and no further warnings.

    This should be resolve any issues Veeam Backup for Microsoft had for backing up using the Graph API.


  • Configure Object Backup Copy in Veeam Backup for Microsoft 365

    Configure Object Backup Copy in Veeam Backup for Microsoft 365

    In early 2023, Veeam released their next realease of Veeam Backup for Microsoft 365, with v7.  This brought a load of new features, allowing it provide faster and more resilient backups for Microsoft 365.  One of the biggest features was the ability to perform backup copies of your tenancy, allowing you to keep a second copy whether that be on another datastore, another data centre or off up into the mighty cloud.

    Backup copies aren’t new, they have been around in Veeam Backup and Replication for over 10 years, and it only made sense to extend this feature to 365 backups.

    A backup copy is a separate job from the primary job, this allows more flexibility and ease of use – so it is important to name the backup copy with something that distinguishes it from the primary job.

    Before we get into the configuration side of things, there are a couple of pre-requisites for being able to run a backup copy:

    • Only Object Repository to Object Repository is supported. You cannot perform a backup copy of the original JetDB – If you want to backup your JetDB, you could use Veeam Agent Based backup to take a copy of the JetDB files or veeam Backup and Replication to take a backup of the VM hosting those JetDB files.
    • Your Object target must have it’s own Proxy/Repository attached, you cannot share with Object targets. You will receive an error if you try to use a proxy folder that already contains data.
    • If you want to use Immutability, Object Lock must be enabled on the bucket before configuring the job.

    That’s pretty much all there is to watch out for and consider. The rest of the steps should be fairly familiar if you have already gone through and set up Object Repositories for your existing jobs.

    Config

    1. If you are using an on-prem solution for your object storage, like MinIO or Object First, you will need make sure your storage is pre-confgiured and accessible from your 365 server.
    2. Create your bucket on your Backup Copy target storage and confirm that you can access the location. Below you can see that minio-001 (left) contains my primary backup that i hav already configured and taken an initial full backup of my 365 account. My Backup Copy target, minio-002 (right) currently shows no backed up data for 365,


      You will also note that i currently only have 1 backup job configured.

    3. Navigate to Backup Infrastructure -> Object Storage and  select Add Object Storage.  This will open up the Object Storage connection wizard. Here you can start by giving your object storage a Name and Description

    4. Select the correct object storage solution to meet your requirements. If you are using something like MinIO, Ceph or another S3 Compatible object storage, select S3 Compatible, otherwise select the matching cloud target.

    5. In the next screen, you will need to enter your service point, Data Center Region and specify your Account Credentials for your target repository. These will be saved into the Veeam DB. The service point will be that of your backup copy target.

    6. Ensure that you have already prepped your repository with a bucket to connect to. Depending on the number of buckets that you have, the drop down menu will display all available buckets – Select the correct bucket for your target. Once you have selected your bucket, click Browse  and select the bucket name – Click New Folder and name your Backup Copy target folder.

    7. Another great feature brought into v7 is the ability to create Immutable Backup Copies. However, please consider and understand the use of this feature, whilst it is always recommended to have immutable backups, in Veeam Backup for Microsoft 365, the retention period you select for the job is also the retention period of the immutable backup. In other words, If you select to retain 2 years worth of backups before they age out and have applied immutable backups, if the customer leaves and you are required to delete the customers data off your system, you will need to wait until the last backup has aged out over 2 years before it can be removed.
      https://helpcenter.veeam.com/docs/vbo365/guide/immutability.html?ver=70

      Click Finish to create your object storage

    8. You will need to create and Object Repository that attached the Object Storage to a Proxy and a caching folder for the database. Select Backup Repository > Add Repository (You can also right click to select Add backup repository). Once again a wizard will open up and you can give the repository a Name and Description


    9. Select Backup to object storage – this will select the next few windows applicable to object storage. If you select the second option, this will allow you to create a JetDB repository – which unfortunately won’t work with what we’re trying to achieve here.

    10. Depending on your infrastructure design, you may have multiple proxy servers, and they may be in different locations. Select the right proxy server that connects to your object storage target. Here you can then create the local cache path that will reside on your proxy server. You should have a drive preconfigured to contain your cache files. Select Browse and then select the drive and path then New Folder to create the target cache folder,

    11. Select the target object storage. If the object storage is already in use by another repository, it will not show up in the list.

      You can configure an encryption password to ensure that the data is encrypted at the target. This is different from immutability, encryption will prevent someone from reading the data without the encryption password, but will not prevent them from deleting the data.


      During the validation process, if the selected cache folder already contains an existing database in it, you will receive an error message advising of this. You will either need to clear the folder or create a new folder.

    12. Select your retention policy and the type of backup you want to take, whether it be as an image or at the item level, make sure you read carefully the different options available.
      By selecting Advanced you have the ability to choose when you want the retention policy applied – make sure you understand how this works, otherwise you may end up paying additional egress charges.
      https://helpcenter.veeam.com/docs/vbo365/guide/new_repository_4.html?ver=70 

    13. Lastly, once the targets have been configure, it is now just a case of creating the backup copy job. Head back over to Organizations > Select your existing primary backup job and click Backup Copy  – this will open a new wizard that looks similar to the primary backup job creation wizard.

    14. Here you will be able to select your Target Backup Repository – take note that this is the Backup repository and not the Object Storage directly.

    15. You can choose when you want to run the backup copy job. You can select for it to occur immediately as the primary backup job runs, you can set a specific time of day or on a repeated schedule.
      There is also the option to run the backup job within a pre-defined window.

    16. Once the job has been configured, if you did not select the “Immediate” option to run the job, you can go ahead and run it for the first time. You will note that the job type is shown as Copy and the the start and last backup information is avialable.

    You have now configured a backup copy of your primary Microsoft 365 backup.

    For more information, please check out Veeam’s KB articles related to backup copies. 

  • Extending PowerShell -Matt Allford – Pluralsight Course Notes – Part 1

    Extending PowerShell -Matt Allford – Pluralsight Course Notes – Part 1

    Diving into my 2022 goals and starting at revisiting PowerShell, this post is part 1 of my notes that I have taken while going through Matt Allford‘s “Extending PowerShell” Pluralsight Course.  Please head over and check out the course and let him know what you think. There is a lot of indepth detail and knowledge on how to work with PowerShell Modules and context around each of the topics.


    Snapins

    • Previously Snapins were used back in version 1  of PowerShell – they were adding commands as oppose to modules that hold series of commands.
    • Required installation from an installer file and registered to the local machine
    • Lacked capabilities like dependencies.

    Modules

    • Modules – Preferred code package method.
    • New
    • Comes as a set of files, but some contain DLL files.
    • Allows for reuse and abstraction of  PowerShell commands
    • Package of related commands, grouped together and can be vendor specific so that you only need to load the modules that are required. There are some built in modules that are imported by default and other modules can be added into the Environment Variable to load later on.


    An example module available.
    Bits Transfer Module
    This module contains Get-BitsTransfer, etc. -= none of these commands work outside of bits. But all Get, Remove, Set, etc. are in a single PowerShell module


    Each module is an upgrade to the previous.
    Sit in the PowerShell repo
    PSModulePath is default, but any location can be used

    Copying and pasting a module is fine to import, but there are better ways to install and import

    Module Auto-Loading can auto load in modules when you run your PowerShell, but you don’t always want this in case there are conflicting. e.g. Get-VM is both VMware and Hyper-V commands,

    -noClobber is a command to prevent conflicting commands from installing when an existing command has already been installed into the session

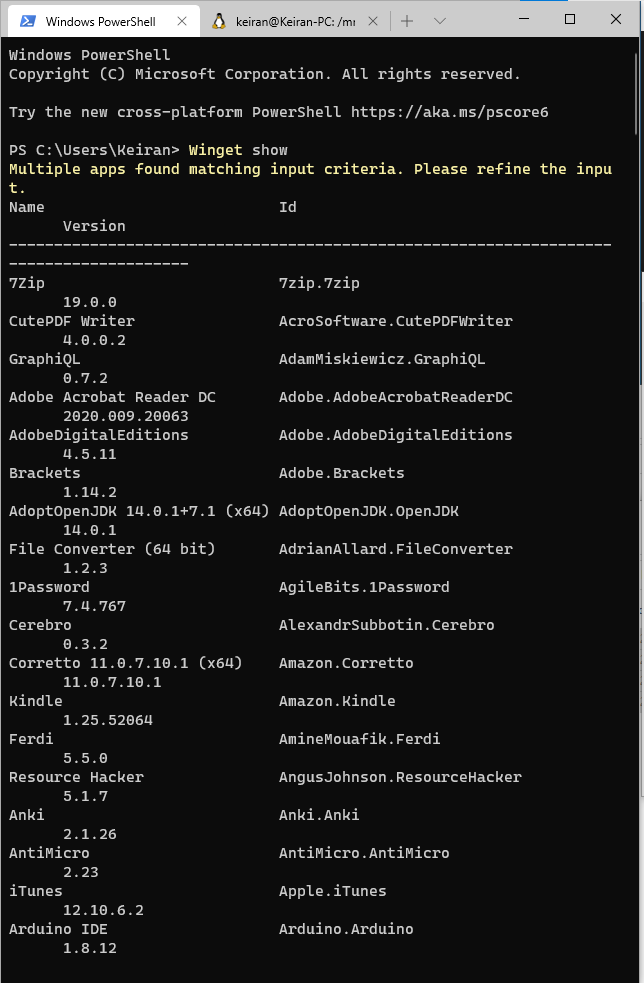
    Install Module (Install-Module)

    The Install module does not import the module for use into the PowerShell session, but it does install the module onto the local machine into a path that is in the Environment Variable location, allowing for the module to be either imported into a session later or added into the Auto-Loading.

    Using the Install-Module -Name <name> will install the module from the PowerShell Gallery if it exists.

    In the above example, once the module is installed, it is not automatically imported. The Import-module needs to be run.  As this is running in PowerShell 7 Core, the Vmware.ImageBuilder is not supported and is not imported.


    DEMO – Working with Module Paths

    To find the PsModulePath, Use the $env:PSModulePath commands. However, you can also add -split “;”  to separate out the lines where a semi colon is located.

    To add additional default locations for modules, you can add them via $env:PSModulePath = $env:PSModulePath + “;C:\<My module path>”

    By adding the semi colon to the start of the location above, this will allow the environment path to see this location as a separate path instead of just continuing the line of the previous path. E.g. C:\Windows\system32\WindowsPowerShell\v1.0\ModulesC:\<my module path>

    Setting $env:PSModulePath will only be set for the sessions.  In order to make it persistent, it will need to be added to the PowerShell Profile, or added to the PowerShell Environment Variable. This can be done via windows GUI or through Powershell

    Start by creating a new variable

    E.g. $currentPath = [Environment]::GetEnvironmentVariable(‘PSModulePath’,’Machine’)
    $currentpath -split “;”
    New path $newpath = $currentpath + ‘;C:\<my module path>’
    [Environment]::SetEnvironmentVariable(‘PSModulePath’, $newpath, ‘Machine’)

    The above commands are first creating a cmdlet with the environment set. This will then allow the second command to run and list out the existing paths already set in the system environment variable path.

    The 3rd lone is creating a new cmdlet that is adding both the existing system environment variable paths and the new path together (hence the + sign) – keep the semi colon prefix in mind

    The last command is setting the System Environment Variable path to include the $newpath cmdlet. You need to make sure you add the previous Environment Variable location and cmdlet together with the new path each time to ensure the complete PATH is set.


    DEMO – Importing and Auto Loading Modules

    How modules get imported explicitly and automatically.

    First run Get-Help Import-Module to  view the mandatory parameter.
    –  Only required is -name
    Run Import-Module -name <name of module>  to install the module.


    Auto-loader

    The auto load feature is used when a cmdlet has been run that is part of a module that has not been imported but is sitting in a module that is located in the Environment Variable Location. Powershell will search for the required cmdlet and import the module

    Auto load won’t work if the module is not sitting in one of the Paths in the PS Variable Path.

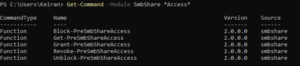
    Below in the example, using the command Get-SmbShare searches for the module and then auto loads the module as it is an available option.

    Import a module that is not in a Environment Variable location

    In the event you have a module that has been downloaded to another location that isn’t in the Environment Variable location, you can easily import it using the full location path in your import command.

    Import-Module -Name C:\<Path to file>\ 

    e.g  Import-Module -Name C:\PowerShell\Module


    Use Import-Module to import with a prefix

    As above, we mentioned the -NoClobber parameter that will skip any commands in a module that are conflicting with an already imported module.  Another method to avoid a conflict is to add a prefix, allowing the commands to be imported uniquely into the session.

    In the below example, SmbShare is already loaded and does not contain a PreFix (Block-SmbShareAccess)

    The Module is then removed and then Imported back into the session with use of the -PreFix parameter.
    This will now add the prefix of “Pre” to the front noun in the command.  (Block-PreSmbShareAccess)
    So when running the command after importing with a  prefix it will need to be,.

    C:\> Block-PreSmbShareAccess

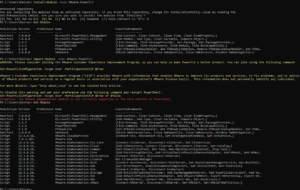
    Demo – Indentifing Commands in a Module

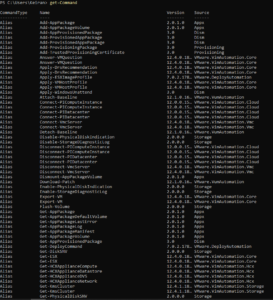
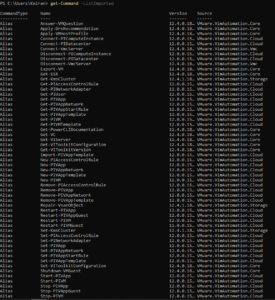
    Running Get-Command is not a great way to search for a particular command in a PS module. This will load every command that is available. This is far from ideal.

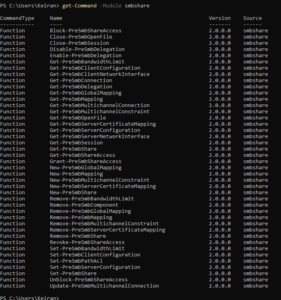
    If you run Get-Command -ListImported This will only show you the commands for, you guessed it, the commands only available in the modules that are currently imported into the session.

    In order to only find the commands of a particular module that is currently imported and not receive commands for other modules, then using the -Module parameter will cut this list down to only those commands that are required.

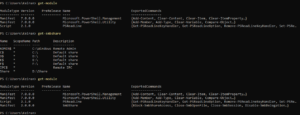
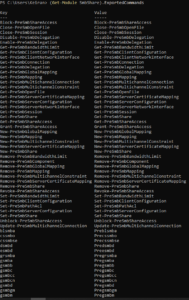
    Alternate to getting the commands for a particular module is to use the Get-Module SmbShare  – however, this will only listed some of the commands off to the side under the “ExportedCommands” column.

    To view this better, use the (Get-Module SmbShare).ExportedCommands to display this in a nicer way with also the key and value columns.


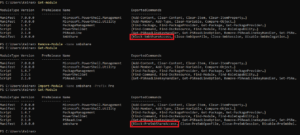
    Finding a command by using the Verb

    Using the PowerShell Verb-Noun layout, there may be times that you want to do a particular action and know that the verb you need to perform the action. You can search on the verb that is part of the module to get a list of the commands that are available to help narrow down to the right one. This is done using the -Verb parameter followed by the verb to search for.

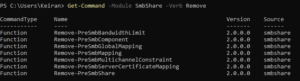
    Get-Command -Module SmbShare -Verb Remove


    Finding a Command by Wildcard

    There may be a case where you only know a part of the command that you are looking for and need to perform a wildcard search. This works by still using asterixis on both sides of the word you are looking for.

    Get-Command -Module SmbShare *Access*


  • My Microsoft Build Release Previews

    My Microsoft Build Release Previews

    This post may come as a bit of a surprise to some of you who have seen my focus mostly on Storage, Backup and VMware products, but the world is a bigger place and there are technologies out there that are evolving and my interests have done a complete 360 back to my earlier days.

    This past week, we have seen the Microsoft Build conference take place streaming hundreds of sessions live from the presenter’s own home. For me, this has been a great opportunity for technologist to be able to be part of a conference they may not have been able to attend previously. I know for myself, I would not have spent the money previously to attend in-person, but that has more than likely changed now that I have had a a front row seat into the benefit of these sessions and what they have opened my eyes up to.  For the past couple of months, I’ve been thinking about moving back into the Microsoft space, I’ve spent the last 6 years focused on virtual infrastructure and less on guest OS. I’ve been dabbling in Linux for a little, but I am heavily focused on using MacOS as I’ve found Windows to be a bit too restrictive, that was until Microsoft started releasing some new exciting applications that have made a world of a difference to me and I feel have created a much more inclusive ecosystem. I use Windows 10 in the office, but any other time I will use my MacBook Pro. Since Microsoft brought out WSL, I have been using Ubuntu for all my SSH sessions and doing general command line web operations. Prior to this, I would pull out my MacBook or fire up a Linux VM.

    At Microsoft Build, there have been a number of new applications that have been released for preview that I am excited to see. The ones I am going to mention in this post are what I have found will help me in my day-to-day or just handy to have. There are many more out there, but here is my shortlist.


    1. Windows Terminal
      Here we find what looks like a standard Powershell window, but alas, it has much greater functionality that just running a couple of one-liners or scripts, by default, there are several preconfigured command line tools available, but you can also edit the settings via it’s config file and add more applications to keep them all in one spot. Windows Terminal may only be command lines, but it’s the way you set it up and use it, that’s what makes it so powerful. Windows Terminal is now 1.0

      WIndows Terminal 1.0

      Windows Terminal Config
    2. PowerToysThis has been a very welcomed addition, although still in preview, PowerToys adds extra tools to be able to customise and manipulate files, and customise your workspace with FancyZones.
      FancyZones allows you for create layouts for applications and have them snap to certain areas of your desktop to create a useable workflow for our day to day activities. You can use the templates already provided or create your own layout. There are multiple colour options to show which zone is currently active and which others are inactive.

      PowerToys FancyZones Options
      PowerToys FancyZones Templates

      The next 2 PowerToys will eliminate the need for 3rd party applications to be able to do bulk file renames and also image resizing. Don’t you hate I when you take a new set of photos for an event and they are all need something like “img_xxx”? – Well now you no longer need to either sit there renaming one by one or running through a 3rd party tool. PowerToys brings with it a simple File Renaming feature “PowerRename” that can be pinned to your explorer menu, allowing you to easily select your files, right click and Rename Files. The tool uses a “Find and Replace” method, so you can save time and only rename certain words, if needed.

      The Image Resizer works in a similar to the File Renamer. In the settings, you can create your presets for your image sizes and then you just select your images, right click and choose the Image Resizer. You are then presented with a window to select the size you would like all your select images to be.

      PowerToys PowerRename
      Image Resizer

      Image Resizer Settings
    3. Windows Package ManagerIf you have ever used Linux, whether it be Red Hat or Debian variants, you should be well aware of the yum (dnf) or apt package managers (some others exist for other distributions). Microsoft are now adding yet another feature to Windows to be able to move more inline with the evolving community and have release their new Windows Package Manager. Currently also in preview, it allows you to install recent releases of Windows applications through the commend line using winget.  Simple commands such as winget install and winget show will allow you to find and install available applications.  The winget show command will list the applications and their most recent version available. Once the application has been installed via the package manager, you will then be able to use it as any other application installed from an executable or msi file.
      winget install

      winget show


    Microsoft has certainly shown that they are listening to what users want, and are learning what people need to be able to operate in their day jobs. Previously, we needed tools such as putty to connect to SSH sessions, but with Terminals and WSL2, we are now able to connect with all in one tools from one operating system. I am excited to see what else is out there coming from Microsoft and where they roadmap is heading. If you missed any Microsoft Build sessions, you can head over and watch them on-demand.